Meet the Motherhood Collective Staff: Carrie McGinn

Ever wonder who's behind The Motherhood Collective? Over the next few weeks we'll be introducing you to our dedicated team of volunteers. These women are all mothers - once, twice or many times over. While they come from different backgrounds and have various approaches to pregnancy, birth and parenting, each one is dedicated to creating a place where ALL mothers can find education and support. Meet our Director of Hospitality! Carrie is such fun, you should get to know her too!

0002We met sweet Carrie after the birth of her first son, and had the privilege of walking alongside her during her second pregnancy! After observing all the ways in which she naturally encouraged and supported her fellow mothers, we asked her to come on board as our Director of Hospitality in the Spring of 2013.

Carrie's most important task is the organizing of Postpartum Meals. She interviews mothers who have requested this special service; then, upon the birth of their child, sets up a "train" of meals. These meals are provided by other women of The Motherhood Collective© and are tailored to the needs of each postpartum family's needs. She also volunteers her time on Mondays at The Motherhood Café, serving as a Group Leader and an oh-so-valuable Kitchen Worker.

With a mischievous sparkle in her eye and free-flowing laughter, Carrie's creative thinking, hard work and professionalism bring such value to our team!

Thank you, Carrie, for serving the women and families of The Motherhood Collective©.

~~~

Are you a cook? Would you love to serve by bringing a meal to those in need? Do you have a heart for mothers figuring out the postpartum stage of motherhood? Would you like to send a gift card from afar? Email Carrie at hospitality@themotherhoodcollective.org. We would love to add you to our hospitality team!

Recipe of the Week - Sweet Potato Brownies

spoon_edited-1.jpg

This yummy recipe has been sweeping the internet lately. Who doesn't love a guilt-free brownie?!

Sweet Potato Brownies Prep time: 35 mins Cook time: 30 mins Total time: 1 hour 5 mins Serves: 5-8

Ingredients 1 sweet potato 3 eggs, whisked 1/4 cup Gold Label Virgin Coconut Oil, melted 1/3 cup raw honey 1/2 cup Enjoy Life Chocolate Chips 3 tablespoons Coconut Flour 2 tablespoons unsweetened cocoa powder 1/4 teaspoon baking powder 1/4 teaspoon vanilla extract 1/4 teaspoon cinnamon pinch of salt

Instructions Time to bake that sweet potato. Preheat your oven to 425 degrees, use a fork to puncture holes all around it, then throw in the oven for 25-30 minutes. Once your sweet potato is soft and cooked through, peel off the skin and mash it up in a bowl. And turn your oven down to 350 degrees. Now add your wet ingredients: coconut oil, honey, vanilla, and whisked eggs to the bowl and mix together. Then add your dry ingredients: coconut flour, cocoa powder, baking powder, cinnamon, salt and chocolate chips. Mix well to incorporate. Pour into an 8×8 glass baking dish Bake for 30-35 minutes. Let rest to cool a bit.

Recipe originally posted at: http://paleomg.com/sweet-potato-brownies/

Kanned Goods: DIY Natural Shampoo

Five months back, it finally happened.  I decided to go au natural  with my hair.  I had already reduced/cut chemicals, additives, and what-not in many areas of the home, but by golly I was holding on to my Garnier Fructis shampoo and mousse.  I still love the stuff, but have been more than pleased with the results of my homemade shampoo and yes…gel :). My first thought when people say they are going natural on their hair is the “No Poo” challenge, which basically means no shampoo, only baking soda and apple cider vinegar.  Well, there was some courage lacking in this department, so I thought I’d attempt an in-between.  I knew I didn’t want to pay for natural shampoos, so I decided to try a few recipes.

Easy, cheap, and effective shampoo

Of course, everybody’s hair is different, so the “no poo” might actually work for yours.  For some, my recipes might not work (although I think they’re pretty awesome).  Regardless of how healthy your hair is, there will be a transition period, especially if you use hair products regularly.  My transition period  took about a week.  Even if all you use on your hair is a store bought shampoo, you would be amazed at how much it still strips moisture from your hair (which is why so many people feel the need to then add a moisturizer).

I’m an all-or-nothing kind of gal, so I vowed not to put anything store bought in my hair for one month.  Yikes.  I was terrified.  I was expecting oily, flat, smelly hair that I would have to wrap in a bandana every day.  For the record, I’m not a bandana or hat person!

Nevertheless, I took the plunge.  I was honestly surprised at how painless it was.  And though I like it better now that my hair has fully adjusted, it really wasn’t so bad.  I used a blow dryer and brush and made it work.

Now, I spend hardly anything on my shampoo, and even less than that on my homemade gel (which I am LOVING! in this summer heat and humidity).

Shampoo Recipe 1:

If you feel your hair is damaged and could benefit from a gentle “stripping” shampoo, I would recommend this recipe for 1-4 weeks.  I used it for 3 weeks and it was very effective.  I personally wouldn’t recommend it for long term use due to how powerful castile soap can be when not diluted as much.  However, lots of people find it effective on their hair.

Mix:

¼ Cup Water

¼ Cup Liquid Castile soap (I use a scented Dr. Bronner’s)

½ Teaspoon Oil (like jojoba, olive, coconut, or grapeseed)

Shampoo Recipe 2:

This is my daily shampoo recipe that I use now.

Ingredients:

Note:  This is for a full recipe.  I usually halve it because I don’t want to store a gallon of shampoo

1 gallon of water

8 tea bags (I like a cheapo green tea best; you could just use water, as well)

1/2 cup baking soda

1/4 cup castile soap (I use a scented one-peppermint-so I don’t have to add essential oils)

3 tsp xanthan gum (for thickening; you could use cornstarch as well, but it tends to clump easier)

essential oils (about 30 drops-optional; I don’t use)

Instructions:

Place tea bags in large pot with water.  Bring just to boiling, then remove from heat, cover, and let steep for 10-15 minutes.

Remove tea bags and stir in baking soda.  It will fizz for a minute or so.

Mix in the xanthum gum, a little at a time, whisking vigorously.  Then add the castile soap.

After it cools completely you can stir in your essential oils (optional).

You can store the shampoo in an old washed out container. (I use a Homestead Creamery Jug.)  I put what I use daily in a spritz bottle.  This works really well for helping it foam, as homemade soaps don’t have all the foaming agents of store bought.

Gel recipe to come next month, and when my hair gets a little longer, I will begin experimenting with a detangling conditioner!

Recipe adapted from:  http://ashleyshomemadeadventures.wordpress.com/2012/01/24/homemade-shampoo/

A Seamless Back to School

August is "Back to School" Month for many at The Motherhood Collective. We were happy to share this post last year and thought the suggestions were so great, we'd share it again! Even if your child isn't heading back to the classroom, we hope that these thoughts on transition will inspire you. ~TMC ---

Whether you're homeschooling, co-oping, or sending your child to school; your life is about to adjust a bit with the beginning of school! The key to making it a seamless transition is spending some time in preparation! That word "preparation" sometimes sounds like a scary one to me. We have 3 kids (10, 8, and 5). This is my first year with all three kids in school which is a major life change for me. I've had someone with me for almost 11 years, so the first couple days of school have been very emotional. This season is a stressful, but exciting time for each of us!

A goal in our house is to find balance in all areas of our life: emotional, physical, and spiritual. Facing this new season takes our job as moms to a new focus. Here are a few tips to help you prepare for a seamless transition and a happy home.

Plan your breakfasts: I fall into the routine of letting my kids have cereal and fruit each morning, but this year I am challenging myself to wake up earlier and fix them a healthy breakfast (realistically a few times a week). Kids need a balance of protein, whole grains and good omega oils to get their days started. Try making them a green smoothie each morning, a fresh juice, some whole grain muffins, buckwheat pancakes, homemade granola or local eggs and 100% whole grain or gluten free toast.

Incorporating omega oils such as chia seeds, flax seeds and other sources have been known to help children behaviorally and mentally. One study says: Supplements of omega-3 and omega-6 oils can improve the behavior of rowdy kids and help language skills, researchers from England have found.During five months, 65 children with behavioral problems were given a daily supplement of omega-3 fish oil in combination with evening primrose oil (omega-6).

Be creative with their lunchbox: There are so many great ideas out there, especially on pinterest, for lunchboxes. Don’t be satisfied with good old PB&J everyday.. although they will probably have it once a week at my house. With just a little thought and changing around ingredients to make their lunchbox more interesting, your kids will enjoy new real foods without any trouble. Introduce a new veggie or fruit each week. Don’t forget a little note from time to time.


Allow time for some exercise: Fall sports leagues, good ol’ playing outside, or a family walk are all good ways for your child to decompress from a day of using their minds. Being part of a team teaches them many valuable lessons as well. Personally, I have a hard time with teams because our kids are gone for so much of our day. I would really like them to be home with us in the evenings. But I have found that each child claiming one season is do-able for us. We would go to our son’s baseball practices and games together as a family.

Plan family dinners: According to an article in TIME magazine: Studies show that the more often families eat together, the less likely kids are to smoke, drink, do drugs, get depressed, develop eating disorders and consider suicide, and the more likely they are to do well in school, delay having sex, eat their vegetables, learn big words and know which fork to use.

An older mom once told me she would prep most of her meals while the children were at school, or do crockpot recipes, so that when her children came home from school her attention would be on them and not dinner. When it is time for dinner, include your children in preparing it. This teaches both responsibility, independence, and a new skill set!

You don’t have to make an elaborate meal, but try doing a Meatless Monday, Taco Tuesday, or Wacky Wednesday. Our family enjoys "cooking through the nations". Finding new foods from other cultures and making a theme out of dinner not only helps me prepare, but makes it special for the kids. Having a set theme each week will alleviate the stress of meal planning (which I have not mastered yet!).

Come up with a few questions you consistently ask your kids about their day. Allow them to share their happy and sad times while teaching them about the healthy foods they’re eating. Talk about where the food came from and how it was harvested. Give thanks for real food together.

Rest! Rest is not idleness. But it is a time where we stop, relax and enjoy one another. Disconnect from electronics! Reading together, playing games together or walking together allows your child to connect with you emotionally as well as, decompress from a day of mental focus. Allow a day per weekend to really rest and do what your family enjoys most. Many families in our culture do not understand how to rest. We run from event to event, party to party, sport to sport. If we stop for a moment, we can learn so much from one another and care for the emotions that our family is experiencing.

Back to school time is not just about helping their minds, it's about their emotions and their physical development! By feeding your children healthy, real foods and exercising their bodies, they will be strong physically. With your time writing notes, reading to them, and meals shared together, their emotions are free to develop appropriately. May your back to school days be a special time for your family!

Thank you for allowing me to share these thoughts with you! For more on this subject and others, please check out my website www.puregoodness.net!

Recipe of the Week - Mom's Fresh Mint Tea

777063_250211731.jpeg

So, it's "Mama Confession Time" here at the Motherhood Collective. Ready? *Deep breath.*

I didn't plant my  garden this year.

Yikes, well there it is.  I know you all are just shocked.

I've got lovely garden boxes full of weeds because tending the babies won over tending veggies.  However, last year I planted mint.  Mint is a wonderfully easy herb to grow and once you plant it, it keeps coming back.

So I have tons of completely "free range" mint and I thought I'd share my mother's recipe for homemade mint tea. You can serve it unsweetened, lightly sweetened, or SUPER DUPER (aka Southern style) sweetened.

Photo courtesy of http://foodgirl-sweet.blogspot.comIngredients: A handful of mint - (Clearly cooking isn't always an exact science.) 7-9 black tea bags 1 gallon of water Your "sweetening" preference - sugar, honey, pixie sticks, etc.

To make a gallon, cut a big handful of mint, rinse it off and put it in a container with 7-9 black tea bags. Boil 2 quarts of the water. Pour the boiling water over the mint and tea bags. Cover it and let it steep about 10 minutes or until the next 2 quarts of water comes to a boil. Pour off the first batch into a gallon pitcher. Now, pour the second 2 quarts onto the same mint and tea bags. Steep another 10 minutes and add to the first batch. My mother adds about 3/4 cup of sugar, so that's what I do...because you should ALWAYS do what your mother tells you!

If you find that this makes your tea too strong, use fewer tea bags next time. If it's not sweet enough...well, add more sugar.

So as we reach the end of this summer, see if you can find a little remaining mint, and try this recipe.  And keep it in mind come spring.  If you plant a little mint, it will truly take care of itself and you'll be able to enjoy homemade mint tea all summer long!


How To Beat Thrush!

images-1

How to Beat Thrush!

About 90% of all newborns are colonized with the Candida albicans fungal organism (thrush). Once you have been diagnosed with thrush by a healthcare professional, you will need to carefully manage this infection or it can be a pesky reoccurring issue for you and your baby.

Chronic conditions that can cause thrush to become more prevalent are diabetes, anemia, endocrine disorders, PKU, HIV, mother’s with chronic yeast infections, and mother’s and babies that were given antibiotics during labor or immediately after.

Here are some suggestions that can help with the management of thrush. It might seem like this is an overabundance of ideas and information, but it is certainly worth it, if it can shorten your bouts with thrush.

The most common ways that thrush is dealt with are either through prescriptions or alternative treatments. The most commonly used prescriptions for thrush are Nystatin suspension or Diflucan, also known as Fluconazole (this should be used as the last resort). Sometimes these work well on their own, however there are other methods that you can use in addition to these to help beat the thrush bug.


Herbs/alternative treatments

images

Gentian Violet has been used for many, many years. It is inexpensive, effective, advantageous, and can be purchased over the counter. Always check with your healthcare provider before using Gentian Violet. Gentian Violet commonly comes in a 2% concentration, however this should not be used without diluting to 1%. It can be diluted by the pharmacist or you can dilute it by half with sterilized water as well. Gentian Violet can be used once a day, for 4-6 days, but should not be used past 7 days. The Gentian Violet can be applied to the baby’s mouth with a Q-tip and to the mother’s breast with a Q-tip, gauze pad or cotton ball. It can also be applied to the baby’s hands. It is very messy, so be sure to wear clothing for yourself and the baby that you do not mind getting stained. Another way of application for Gentian Violet tothe baby’s mouth, is to paint the nipple and areola with a cotton ball and quickly bring the baby to the breast to feed. Gentian Violet can be dangerous if used improperly or for too long.

Unknown-1

Grapefruit Seed, (taken orally) 250 mg, 3 times daily, or 5 to 15 drops in 5 oz of water, 2-5 times daily. DO NOT USE GRAPE SEED EXTRACT, ONLY GRAPEFRUIT SEED EXTRACT.

Unknown-3UnknownUnknown-2

A probiotic for the momma. Acidopholis Bifidus: 400 million-10 billion viable units daily. This should be used for up to 2 weeks after the symptoms are gone. Based on anecdotal evidence, it is difficult to know how well this works, however it has been used for years. Oral supplements of Acidopholis contain beneficial bacteria that can help to limit the Candida in the digestive track.

  • Garlic tablets can be taken in doses of 3 tablets, 3 times a day, for 2 or more weeks.
  • Vitamin B- at least 100 mg daily.images-2


Hygiene Protocol for Thrush recipients

All people and parts need to be treated

Mother:

  • Wash hands every time after using the bathroom, changing the baby’s diaper, and before and after every breastfeeding session. All family members who change diapers or bottle feed the baby should follow these guidelines as well. Use soap and water while lathering for 20 seconds.
  • Nipples should be rinsed after each nursing with clean water and air dried (Thrush organisms thrive on milk and moisture).
  • 1 TBSP of white vinegar in 1 cup water can be applied with cotton ball after nipples are rinsed. Or 1 tsp of baking soda in 1 cup water can be applied with cotton ball, this mixture can also be applied to breast, baby’s mouth, and baby’s hands. (Keep either mixture in a sealed jar to keep sterilized, do not re-dip the cotton ball after it has touched the breast. )

Baby:

  • The diaper rash area needs to be washed and rinsed with clean water every time the diaper is changed.Unknown-4
  • Several times a day the baby’s bottom needs to be left out to air dry.
  • An appropriate anti-fungal cream can be used.
  • Disposable diaper and plastic pants usually aggravate thrush because they hold moisture. Use cloth diapers if possible during thrush.

Father:

  • Dad’s should be treated as well if Sexual Relations have taken place during the time of infection.

Everybody:

  • You do not have to have visible signs for the thrush organisms to be present.
  • Even when symptoms seem to be gone it can reoccur easily. So, make sure to continue treatments for 1-2weeks after the Thrush seems to be gone.


Household care


  • Toys, Pacifiers, Bottle nipples, breastfeeding pump kit parts, medicine droppers, nipple sheilds, and teething toys need to be boiled daily for at least twenty minutes. They first need to be washed in soapy water, then rinsed in clear water/ white vinegar solution and lastly boiled. Pacifiers and other rubber nipples need to be replaced weekly. Nursing pads, bras, diapers, bed sheets, crib sheets, and all towels that are used after hand washing or bathing all items need to be washed in hot water with 1CUP bleach in wash water. If items cannot be bleached use 1CUP white vinegar instead. Items should be dried in a very hot dryer or the sun.
  • Paper towels should be used after hand washing whenever possible.
  • Toothbrushes and all dish ware should be washed with soap and water with vinegar. These items also need to be run in the dish washer daily, 1CUP of white vinegar can be added.

Dietary Changes

  • Eat 1-2 cups of cultured yogurt daily and/or cottage cheese, preferably unsweetened.
  • Try to limit food items with yeast, sugar, and alcohol while trying to get rid of thrush.
  • Do not freeze or save any milk that was pumped during infection. Freezing milk does not kill Candida albicans.
  • Add as much garlic as possible to your diet during this time.

Sources: “Ina May’s Guide to Breastfeeding”, La Leche League International, Ameda/Egnell-Hollister Inc., Dr. Jack Newman, M.D.

*All products pictured can be purchased locally at: Health Nut Nutrition 1505 Enterprise Drive Lynchburg, VA 24502 (434)239-5170


Disclaimer : Anticipation and Beyond uses all reasonable effort to provide accurate, up-to-date and evidence-based information for teaching and counseling purposes. All information that is written for blogs, social media posts, and websites is to be used for education and informational purposes only. All data and instruction from Anticipation and Beyond should not be intended to replace or substitute professional or medical advice from your health care provider. Direct all of your family’s concerns, questions, and health issues to your health care provider.

The information provided is not and may not be applicable to every situation. The purpose of Anticipation and Beyond providing guidance and education to new families is two-fold. The first purpose is for the intention of teaching parents about the many choices and alternatives that are available to them. The second motivation is to encourage families to dig down deep and research themselves from reliable resources that will help to enlighten their new journey.


I Don't Want a "Broken" Child

I still get baby emails with titles like “Developmental Milestones Your Child Should Have Reached By Now.”  UGH! I’ve taken to just deleting them on the spot. All it does is get me to compare my child to other children. What is the point of that? So that I can feel good about him doing things earlier than the “norm” or feel horrible when he’s lagging behind in some area that he should have been able to master by now?  No. I’m done. My son, Jax's, biggest issue is crying when I put him down and wanting to be held all the time. My kid is needy. He’s clingy. He’s exhausting. But does that make him a bad kid?

I say that allllll the time... “Jax is so bad”.

While I mean it as a joke, I’ve come to realize that he is not “bad”. He is this way for a reason. Maybe his stubbornness now will translate into an incredible quality as an adult.  Determination and drive to succeed, maybe? Who knows.

I was directed to an article by my best friend that talks about this very issue.  http://www.askmoxie.org/2007/02/qa_separation_a.html (Check it out if you’re interested in learning about an intense child or if you have one and need to feel like you’re not alone!)

So often I’ve felt (and been told) that I need to find a way to “break” Jax of this problem. I’ve been judged terribly even by those closest to me..People have told me that I’m not doing the right things to make him stop.  We have done so much to try to “fix” this:

  • letting him cry it out (He will scream bloody murder for hours and hours.  And that is not an exaggeration!)
  • reinforcing structure so he feels secure on his own
  • making him sit on the floor and “play independently”
  • sitting with him and gradually moving away

NONE of these things are working. I’ve been feeling so guilty lately that I don’t love him like I should. How can I love someone who screams all the time?

Well, I DO love him. A Lot.

And I think I’ve determined that it’s ok that he is this way. It’s ok that he needs to be held. I’ve been more loving and gentle and quiet around him lately and he is, in turn, doing the same! I’ve been attentive to his crying in a way that I was definitely not before. Maybe there is something to this. Maybe I cannot control how he acts with other people, but I can control my interaction with him. So, if I’m more attentive and respond to his needs will he be less needy in general? Will he ever be content to play alone? I don’t know. I can’t know. The only thing I can do is what I feel is best for MY child. MINE. Not anyone else.

But I’m about sick of being judged. He’s a sweet boy. He just wants to be held. So, I’m going to hold him. We can work on independent play and we can work slowly on being ok on the floor by himself, but until that happens I’m going to respond to his cues. That’s ok right now. Judge away. I want to respond to his needs. I won’t have to carry him around when he’s 15.

Probably.

PicMonkey CollageJax1

Thoughts? Do you feel like a big, fat, failure? Yea, me too! But it’s ok. Do you have an intense child? You're not alone!

Please share your story or things that have helped you in our comment section.

Meet the Motherhood Collective Staff: Erica Wolfe

Ever wonder who's behind The Motherhood Collective? Over the next few weeks we'll be introducing you to our dedicated team. These women are all mothers - once, twice or many times over. While they come from different backgrounds and have various approaches to pregnancy, birth and parenting, each one is dedicated to creating a place where ALL mothers can find education and support. Meet the mama behind this blog! Erica has single-handedly brought it to life and given it breath!

Erica Wolfe

Want to write for this blog? This is the woman to speak to -- or email to! In addition to keeping the blog current and substantive, she generously volunteers her time on Café mornings. She often sits among you as a Small Group Leader on Infancy and more recently, as moderator for Panel Discussions.

Erica stumbled upon the Café during her first pregnancy in 2011. Now she is mother to TWO beautiful daughters. What fun it has been to walk with Erica through her pregnancies and early years of motherhood.

With a Northern bluntness and dry sense of humor, Erica grounds our team as she strives to keep us true to our mission of "Nurturing the Mother to Grow the Child."

Thank you, Erica, for serving the women and families of The Motherhood Collective©.

~~~

Are you a writer? Are you passionate about pregnancy, birth, parenting or just motherhood in general? Do you have recipes you want to share with our readers? Email Erica at submissions@themotherhoodcollective.org. We love to add new voices to our site and we always welcome ideas about how to improve content!

I Supplemented With Formula and Am Still Breastfeeding.

On July 6th, Miss E turned 18 months. On that day I nursed her in the glider I hadn't used for a while. As we sat there I couldn't help but think how far we had come. I want to be honest.

Those first few weeks were HARD! I wish people had been honest about it. The thing I heard most often was, "breastfeeding is natural, your body was made for this". Well, supposedly my body was made to have a baby, too, yet, Miss E was born via an unplanned c-section after 12+ hrs in the hospital. I couldn't push her out, but that's a story for another day.

photo-13Anyway here's what I want to say: while I agree formula should not be pushed on anyone, I do believe if used "properly" it can be helpful to a nursing mother. My intent is not to judge how someone chooses to feed their child, but to share how it was beneficial in my own breastfeeding journey. I can already hear the gasps and tsk, tsks from lactation consultants and breastfeeding advocates. But you know what? I don't think I'd still be breastfeeding if supplementing hadn't been suggested.

As a new mom, I was worried about Miss E's lethargy. Her latch was pretty good, but getting her to take an interest in nursing was a bigger problem. I felt that maybe this wasn't the way it should be. I talked to the nurses and they mentioned it to the pediatrician. On his next rounds, he asked me about my concerns and I expressed them. He then shared with me that in his family, his wife, also a pediatrician, struggled with breastfeeding their first child. He said that with all the studies out there, they didn't want to chance nipple confusion by introducing a bottle. It was different with their second child. After much research they decided that supplementing with formula wouldn't be so bad. Their second child was a better breastfeeder. He explained that since my milk hadn't come in yet, Miss E was using a lot of energy for little return and that could be causing the lethargy. He then explained to me how to supplement if I chose to do so. At each feeding, I was instructed to put Miss E to each breast for 10 mins, and only after that was I to give her a bottle. We only did it for her first week. After that I was comfortable enough that my milk had come in and felt she was nursing better.

So what's my point with all this?

I had resolved to breastfeed Miss E, but I know if I had continued to worry about whether or not she was getting what she needed, my resolve may have faltered. Having the formula available allowed me to continue to try breastfeeding without the fear that she would starve. It was a real fear for me, especially after my body "failed" at another natural process, birth. With the formula available, I stressed less about nursing. I knew that if it turned out I couldn't nurse, I had a back up plan.

We also have to be careful when we put so much emphasis on how much of a "superwoman" someone is for breastfeeding. Statements like that neglect the fact that although breastfeeding is natural, not all bodies are made to do it. We would never make a diabetic feel bad for not being able to produce insulin. I think because of my experience, I don't understand why we get into "breastfeeding versus formula feeding mommy wars". Shouldn't the point be that we are feeding our children? There are so many reasons why people choose to breastfeed and there are probably just as many reasons why people choose not to. The important thing for us to remember is cliched, but true. We haven't walked in another woman's shoes and therefore shouldn't judge her decisions.

Meet the Motherhood Collective Staff: Edi Remark

Ever wonder who's behind The Motherhood Collective? Over the next few weeks we'll be introducing you to our dedicated team. These women are all mothers - once, twice or many times over. While they come from different backgrounds and have various approaches to pregnancy, birth and parenting, each one is dedicated to creating a place where ALL mothers can find education and support. Edi - Director of Social Media The face behind all you see on Facebook, Twitter and Instagram!

Meet our Director of Social Media!

As the Director of Social Media, Edi graciously volunteers her time and talents to bring you the quality information, funny quotes and touching articles you read daily. If you contact us on Facebook, Edi will respond. Need a mama question answered by the Motherhood Collective followers? She'll post it for you anonymously and make sure you get the feedback.

In 2011, Edi was pregnant and her mother-in-law shared a newspaper article featuring our organization. It is fitting that now Edi is the one spreading the news about us!

With an always fresh perspective and refreshing honesty, Edi challenges our team as she seeks to be true to our mission of "Nurturing the Mother to Grow the Child".

Thank you, Edi, for serving the women and families of The Motherhood Collective©.

Recipe of the Week - Garden Veggie Linguine with Cilantro Pesto

I may or may not have a secret love life with Pesto.  I love everything about him from his dairy free, herby, nutty, personality to his beautiful color and versatility.  And I love to just eat him up with a spoon. Every now and then, pesto and I go out on the town.  We normally meet up with pasta and veggies.  We have a grand ol’ time.

I thought I’d share this pairing with you.  This version of pesto is good for many reasons—summery, inexpensive, and easy.

So enough about my love life.  On to the ingredients to create your own affair.

Image sourced from: http://www.bhg.com/recipe/pasta/garden-veggie-linguine-with-cilantro-pesto/

Ingredients:

8 oz. dry linguine or fettuccine (I use half whole wheat and half white)

8 oz. zucchini, sliced

8 oz. pkg. peeled fresh baby carrots, halved

2 oranges

½ cup olive oil

1 cup fresh cilantro leaves

1 tsp. dry mustard (I prefer to use a little Dijon mustard instead)

1 tsp. minced garlic

½ tsp. crushed red pepper

Cilantro and/or finely shredded orange peel and/or orange juice (optional)

Meat or Cannellini Beans for protein (optional; we LOVE cannellini beans in any Italian recipe.  We normally sauté them with onions.  YUM!).

Note:  the veggie listings are easily substituted with whatever you have on hand and whatever sounds good.  I’ve used snap peas, cabbage, spinach, and they’ve all tasted great.

Directions:

  1. Cook pasta according to package, adding zucchini and carrots (and any other veggies) during the last five minutes.  Drain, reserving ¼ cup pasta water.
  2. For pesto, peel and quarter one orange.  You could also take some zest from the peel and add it to the pesto.  In a processor or blender combine orange, olive oil, cilantro, 1 tsp. salt (I don’t add this much), mustard, garlic, and red pepper.  Add pasta water or orange juice until you get the consistency you want.
  3. Peel and chop remaining orange.  Toss orange, pasta and veggies, and pesto all together.  Top with more cilantro and orange peel.  Makes 4 servings

Recipe adapted from Better Homes and Gardens.  You can view it here:  http://www.bhg.com/recipe/pasta/garden-veggie-linguine-with-cilantro-pesto/

Understanding the Stomach Capacity of a Newborn

Baby Feet Unnatural proportions of milk are believed by many, to be needed, for feeding a newborn baby.

I would like to put into perspective what is actually needed to fill a newborn tummy over the first few days of life.

A newborn is not thirsty or hungry at birth; the placenta has hydrated the baby for the immediate postpartum hours. The newborn’s golden hour immediately after birth is for bonding, learning how to eat out of the womb, and to start consuming that fabulous colostrum which is excellent medicinally and nutritionally.

How much is too much? Stomach sizes can vary with each baby. Their milk capacity can differ by the gestational age and size of the baby. The average stomach capacity of a newborn is about 7 mL, keeping in mind that 30 mL is 1 ounce. In the first two days of life, 2-15 mL feedings are sufficient for the baby’s well-being.

When babies are given 30-60 mL of artificial milk and are expected to consume this excessive amount, it is an unnatural and unrealistic proportion for their stomachs.

Just to give you a visual of a baby’s tummy…

Age: 1 day Amount Stomach Can Hold: 5-7 mL Comparable Object: hazelnut, thimble, glass marble, thumb nail

Age: 3 days Amount Stomach Can Hold: 22-27 mL (about an ounce) Comparable Object: teaspoon, milk ball, large glass marble

Age: 10 days Amount Stomach Can Hold: 45-60 mL (1.5-2 ounces) Comparable Object: walnut, golf ball, coffee measuring scoop


High volume feeds in the first few days of life can actually stress a newborn’s immature kidneys. That is why colostrum is a low volume, perfectly measured milk. Our bodies know what our babies need. Trust them! --------------- Disclaimer: Anticipation and Beyond uses all reasonable effort to provide accurate, up-to-date and evidence-based information for teaching and counseling purposes. All information that is written for blogs, social media posts, and websites is to be used for education and informational purposes only. All data and instruction from Anticipation and Beyond should not be intended to replace or substitute professional or medical advice from your health care provider. Direct all of your family’s concerns, questions, and health issues to your health care provider.   The information provided is not and may not be applicable to every situation. The purpose of Anticipation and Beyond providing guidance and education to new families is two-fold. The first purpose is for the intention of teaching parents about the many choices and alternatives that are available to them. The second motivation is to encourage families to dig down deep and research themselves from reliable resources that will help to enlighten their new journey.

Recipe of the Week - Yet Another Green Smoothie Recipe

Green SmoothieI feel like I have tried every green smoothie recipe known to man.  I love them all.  My toddler, not so much.  He’ll drink it, but only ever half, and sometimes with bribing.  I know, I know.  Many of you are aware that I’m a big fan of Baby-Led Weaning.  And bribing isn’t a word in their vocabulary.  But I just get so excited about the rawness and goodness of these drinks!  And in my opinion, what’s not to like, right? I finally thought that maybe I was adding too much.  Maybe the flavor palette was overwhelming him.  So I simplified, but still left the greens :).  He downs it now, and also has no idea that I put his probiotic in there ;).  It is now tasty, cheap, and easy.

I had the brilliant idea of adding a little frozen juice concentrate (we use this for vitamin C sometimes).  It adds great flavor, and though we’re not juice fans at our house, I felt this was such a small amount.

This recipe makes enough for all 3 of us.

Ingredients:

2 cups unsweetened coconut milk (more or less depending on how thick you like it)

2-3 bananas

1 + cup spinach leaves

2 + Tbsp. orange juice concentrate (the kind you find in the freezer section)

Blend all ingredients in a blender/food processor.  Adjust to taste.

If you want something more filling for breakfast, add ¼- ½ cup of oatmeal.  It thickens it nicely and is a wonderful grain for mamas and babies!

Recipe of the Week - Baked Parmesan Zucchini Chips

This recipe is simple and delicious and one of those 'tweakable' wonders that make you feel like a super chef instead of a tired mama... who most likely has some kind of food item or spit up in her hair. Plus, if you have a picky eater who has developed a fear of all things GREEN, getting a taste of these bad boys just might help give them the boost they need to be lean mean green eating machines! I give you the tasty and crispy, Parmesan Zucchini Chips.

To be honest with you I don't remember where the original recipe came from, but I DO remember tweaking a few things here and there so I snagged a basic one off of Food Network as a base to run off of. Instead of blabbing on and on about each step... which wouldn't take that long considering it's an incredibly easy recipe... I figured it would be more entertaining and MOUTH WATERING if I walked you step by step with photos of how it went down in my kitchen.

Step 1, of course, is to preheat your oven. Crank it up to 450 degrees if you please, and continue on to step 2: gathering your ingredients. (see Food Network link for measurements - but DON'T FORGET this is almost fail-safe when it comes to tweaking things to make it your own so have fun!)

parmesan zucchini chip ingredients

MY ingredients included: parmesan cheese Italian breadcrumbs salt pepper garlic powder paprika 1 egg yolk water zucchini

Slice the zucchini into 1/4" thick rounds. The thinner the slice the crispier the chip. I've never been a very meticulous slicer so you should know that even the thicker pieces turned out great, with a soft center and yummy crunchy crust!

zucchini slices


In a small bowl, combine egg yolk and water as a pre-seasoning bath for your zucc. In a separate bowl, combine your spices, breadcrumbs, and cheese.

parmesan mixture

Dip each slice of zucchini into the egg wash and then coat with cheese mixture on both sides. Lay slices on a foiled and greased baking sheet, making sure they are laying flat.

Parmesan Zucchini Chips

As a side note, I ended up sprinkling and pressing some of the larger pieces of Parmesan onto the tops of the zucchini for added flavor and because cheese is kind of the best thing in the world. TOTALLY up to you.

Next BAKE the chips for 25-30 minutes, turning 1/2 way through with a spatula to make sure the bottom sides gets nice and crispy.

Parmesan Zucchini Chips

FINALLY you can enjoy the crispy, cheesy, deliciousness of these bite-sized veggie chips. WOW your kids with your amazing cooking skills and watch their adorable little faces as they realize they actually LIKE this mysterious green food. Then, pat yourself on the back and add this recipe to your stack of go-to options for any night of the week!

What did I tell you, simple and delicious! I won't ramble on any longer, but instead let you get right into the recipe! So, in the words of Julia Child... Bon Appetit!

Kanned Goods: DIY Paint Boards with Beeswax Polish

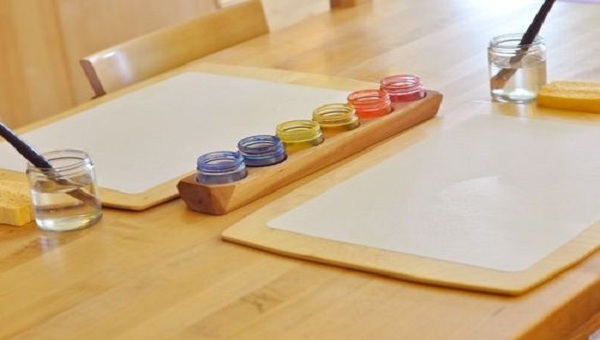
My son and I have really enjoyed adding Wet-on-Wet Watercolor to our list of weekly activities.  It’s cheap, simple, and super therapeutic.  I love watching him just explore the smooth movement of the color across the page. I’ve seen lots of moms use paint boards for art activities, especially watercolors.  They contain the mess and help the paper dry properly.  Plus, it’s something you can use over and over again (unlike just laying down extra paper).  The cheapest ones I came across were $10 plus shipping.  That’s not a horrible price, but in all honesty, they’re not much to look at.  They're just a piece of wood with rounded corners and a natural finish.   Since I’m a glutton for Googling tutorials, I did.  And of course—it wasn’t hard at all.  These instructions will make 2 paint boards plus smaller boards for use with watercolors/paints.  I also found a tutorial for making my own Beeswax Wood Polish.  I only had to buy $6 of supplies total.

Waldorf Style Paint Boards

Supplies: 1 piece of Birch Plywood (I got a 24” square piece for $5.49 at Lowe’s) 1-2 Tbsp. Beeswax (found at local health food store) ¼-1/2 cup olive oil (or coconut, joboba, walnut, etc.)*

Tools: Electric Saw Sandpaper or Sander

Instructions: Cut the piece of birch into 2 paint boards.  I made mine 12”x15” (to easily fit 11”x14” paper).  You can use the smaller pieces as well, or save them for a future project.

Slightly round the corners of all pieces so there aren’t sharp points.

Sand, sand, and sand.  Don’t want splinters in those baby fingers!

Finish the boards, front and back, with your homemade natural beeswax polish.

Homemade Beeswax Polish:

You will want a 1:4 ratio of beeswax to oil.  Grating the beeswax first is optional, but will make the melting faster.

Place beeswax and oil in a microwaveable dish and microwave in 30 second intervals, stirring in between, until beeswax has completely melted and dissolved.  You can add essential oils at this point if you want (make sure it is safe for wood and for toys that go in a child’s mouth).  I didn’t add any because I thought the beeswax smelled so amazing on its own.

Pour mixture into a container that allows for easy stirring.  I poured mine into a glass jar with a lid so I could store any leftover polish.

While the mixture cools, stir every once in a while to prevent separating.  It will thicken first around the edges, so make sure to scrape the sides.  You want to have an even, creamy blend at the end.

Once it’s cooled, rub it into paint boards (and any other wood you have in your house).  A little goes a long way.  Wipe away any excess with a towel, and rub any extra onto your hands and lips.  It’s wonderfully smooth and addicting.

Store any extra in an air-tight container out of direct sunlight.  Olive oil polish will last a year (joboba for 2 years) but refrigerating it will double the lifespan.

Our homemade paint boards are working wonderfully!  The watercolors wipe right off and the paper dries quickly.  You can always reapply the polish if you feel they need it.

*Note:  the olive oil finish will have a slightly yellower tinge to it than other oils, but this doesn’t show up on the wood

Taking Time for Me: An Update

Back in December, I wrote this post about taking time for myself in 2013. That's easy to say, but the truth is, there's often that lingering "mama guilt".  I'm a stay-at-home-parent and homemaker.  My two children are ages four, and 19 months, which means they're still pretty dependent upon me.  My day is currently filled with books, ramps for toy cars, and supplies for (endless) craft projects of my 4yo's own design.  Oh, and trying to keep the house (somewhat) clean.  And preparing 3 meals a day.  And the constant errand-running.  There's barely time for all that...how do I make time for me without sacrificing something that can't really be sacrificed?

The answer, for me, was not to sacrifice (okay, well, maybe the house-cleaning...shhh!), but to reorganize.  At the end of February, we lost my mother-in-law to a 9 month battle with cancer.  That kind of thing takes a toll on everyone, and we were physically and emotionally exhausted.  While we were out of town for the funeral, I received an offer to grab a dream that I hadn't actually planned on getting to for several more years.  The opportunity left me sort of stunned, but I wasn't really in a mental state to process or accept, and so I pushed it aside.

A week went by, and I brought it up to my husband, who encouraged me not to wait for a "better time" because a better time might not come.  Yes, we have small children.  Yes, we were coming off of a challenging year and in a period of mourning.  Yes, it could potentially mean some late night and odd schedules and a new routine on our part, but if it was my dream...

A month, many emails, and a phone call later, I officially signed the paperwork:

901914_10100485831122667_926260054_o

And suddenly, just like that, I had a new career writing children's books.  Or at least, an agent who believed enough in my manuscripts to help me launch a career writing children's books.

It means I'm now adding hours on to my day, writing after the kids are in bed. It means my to-do list is longer. It means I have to pull together a professional wardrobe for a work-related conference after wearing jeans and t-shirts for the last 4 years.

On the other hand...

It allows me to (at least try to) pursue a career that I'm passionate about.  It's new, and fun, and exciting.  And despite the craziness of the last few months, I feel better about me.  I'm eating better, I lost that last 10lbs of baby weight, and I'm a very happy kind of busy.

Who would have thought, when I wrote that post last December that this is where I would be 7 months later?

Motherhood is an exhausting job.  Some days, it can break us down.  I'm encouraging you, when those days come along, take a moment to yourself.  It is when we are our best selves that we can be better mothers, spouses, and friends.

That's my story, and I'm sticking to it. :)

Recipe of the Week - Asian Style Fried Rice and Beans

Image Courtesy of:  http://www.bhg.com/recipe/asian-style-fried-rice-and-beans-1/  

We love fried rice, but it is hard to find a recipe that tastes as yummy with healthy ingredients and brown rice.  I came across this one in the Better Homes and Gardens magazine, and love it!  I never would have thought to add beans to fried rice.  It is super simple as well, and we always have leftovers.

Ingredients:

½ pineapple, peeled, cored, and sliced, or 8 oz. canned pineapple slices (I use canned)

1 Tbsp. oil (I use coconut oil.)

2 medium carrots, sliced

4 cloves garlic, minced

2 tsp. grated fresh ginger

2 cups cooked brown rice (Leftover works even better.)

1 15 oz. can garbanzo beans, rinsed and drained

1 cup frozen peas, thawed

3 Tbsp. reduced –sodium soy sauce

1/3 cup fresh cilantro

1 lime, halved (optional)

(You could also add scrambled eggs, for added protein.)

Directions:

In a 12-inch nonstick skillet, heat 2 tsp. of the oil over medium heat.  Add pineapple; cook about 2 minutes per side until golden brown.  Remove from skillet and set aside.  (Note:  Canned pineapple won’t get the same caramelized look, but it will still taste delicious).

Pour the remaining 1 tsp. oil into the hot skillet.  Add carrots; cook, stirring frequently, for 5 minutes or until just tender.  Add garlic and ginger; cook 30 seconds.

Stir in brown rice, garbanzo beans, and peas.  Add soy sauce.  Cook and stir about 4 minutes or until heated through.  Stir in cilantro.  Return pineapple to pan.

To serve, squeeze lime over all.  Top with additional fresh cilantro leaves, if desired.  Makes 4 servings.

Montessori Moods: Floor Scrubbing (or How Montessori Makes Me Crazy)

The “work cycle” in a Montessori classroom is approximately three hours. My understanding is that they typically have some kind of group time, but the majority of the time the children are self-directed: choosing their own activities, concentrating and being baby geniuses. I get excited if my children will work on anything for more than 5 minutes.

Part of doing Montessori at home is missing the positive peer pressure that happens in the classroom. I’ve also missed the formal training that apparently turns one into a perfectly patient and sweet Montessori directress. So my children have a 15 minute work cycle and I correct them (and direct them) more often than I probably should and in a not-so-sweet voice.

Some reading I’ve been doing lately suggests that focusing on practical life activities helps to restore (or develop) a lack of concentration. I have been neglecting these lately since my older son turned four and I felt like I needed to push him into more math and language activities. We also do “practical life activities” everyday without really trying.

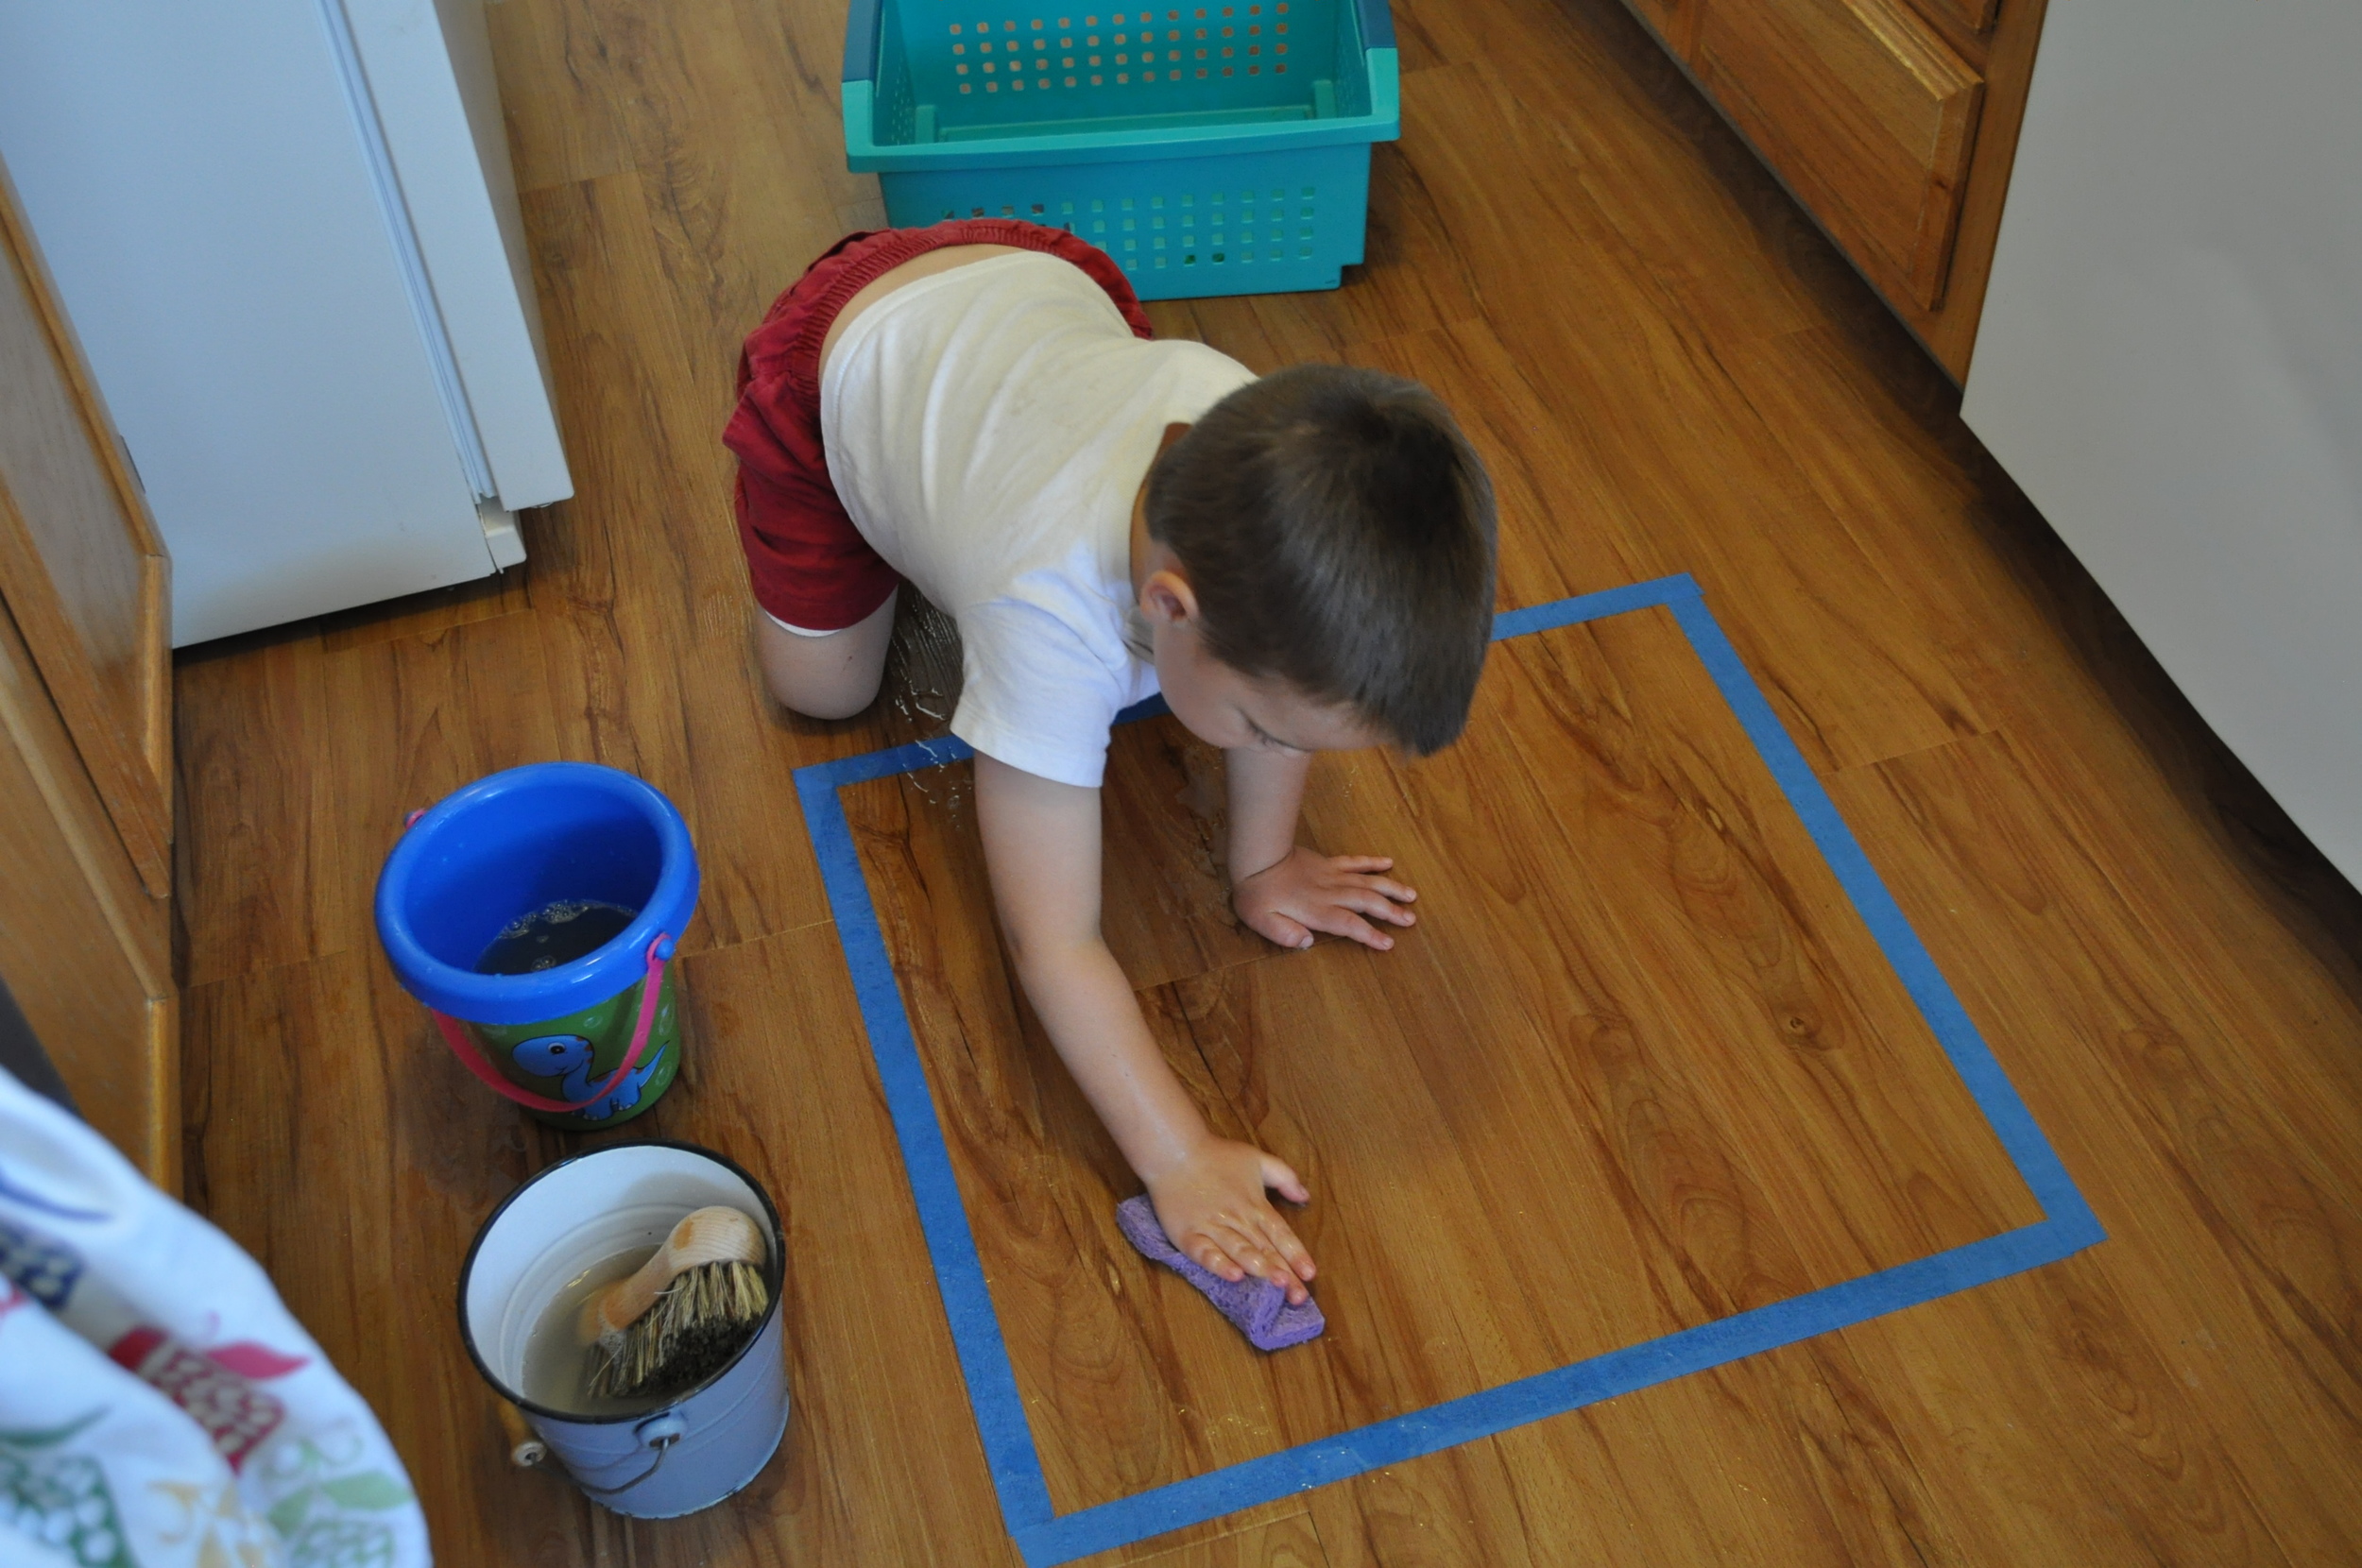
All to say that today I decided to show the children how to scrub the floor. Montessori tends to do these types of activities in a more old fashioned way, but I don’t think it’s necessary. You just need to make sure everything you use is safe for your kids. I forgot to take a before picture, but in the basket was a roll of painters tape, a pair of scissors, two buckets, a scrub brush, a bottle of dish soap and a sponge. I cut tape and made a square on the floor, had my oldest son get water in the buckets, and put a little dish soap in one of the buckets (should have done this before adding water). I showed them how to scrub with the brush and soapy water in small circles, starting at the top left and working to the right and down. Then we wiped up the soapy water with the sponge wet in clean water.

It all sounds very nice, but it resulted in a very wet floor, since unlike the baby geniuses, my children don't usually get things right after the first presentation. DSC_0776 And transitioned into table scrubbing (another actual Montessori activity that I’d shown my oldest before). DSC_0779 This then devolved into toy truck scrubbing. DSC_0780 All of this is very good and fine and I was “following the child,” but then I ran out of all my sweet, patient, untrained Montessori-ness and decided they just needed to go outside and wash toys.

(I was inspired by this blog post, although I don’t recommend using baking soda unless you’re sure your floor can handle it. You also want to be sure that your child is mature enough not to sprinkle it on her head/face or inhale it or anything.)

Learning About Colostrum

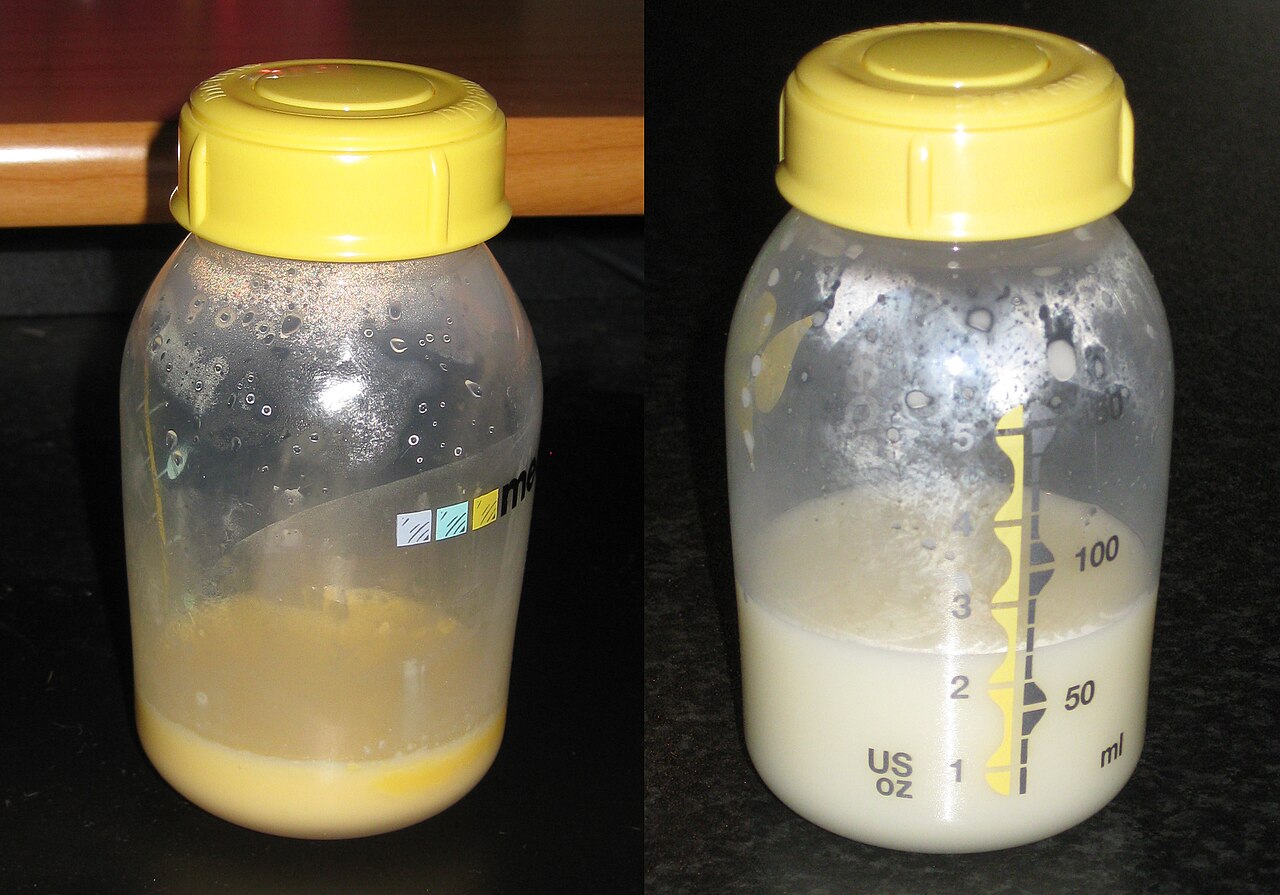
I hear so many mothers ask the same questions. Is there any milk? Where is the colostrum everyone is talking about? Is my baby going to starve because it’s only getting a few drops of milk at each feeding? I thought my milk was going to be white? I can’t feel anything coming out, why? Breastfeeding is natural, normal, intuitive, and instinctual, right? Hmm... If that’s the case then why do so many babies not latch on or fall asleep the minute the breast is in its mouth? If colostrum is the first milk, then why do you only see yellow gooey stuff coming out of your breast, what is that? Where is this colostrum everyone is talking about and what exactly is it? The yellow, sticky, thick, gooey stuff is what many call liquid gold. It is the most precious liquid nutrition that is known to man. That yellow liquid is your colostrum, the keeper and guard of your baby’s life and health.

Colostrum is wonderfully packed with a punch. Every drop contains bountiful amounts of nutrients, antibodies, live cells, lactoferrin (specialized protein), and oligosaccharides (simple sugars). Now that we have a small window into a few of the benefits of colostrum; let’s look at the larger picture of what colostrum does for our newborns, and how much the baby actually needs. The answer is very surprising. A newborn only needs a small amount of colostrum to build that hedge of protection around its little defenseless body. A newborn’s belly, the first few days of its life, is as big as a large marble, by three days it is the size of a ping pong ball, and by day ten a newborn’s belly is the size of a small egg. Colostrum is easily digested because the baby’s body was made to ingest this perfect food. So between the belly size and colostrum’s perfect digestion abilities, a newborn needs to eat often with very small amounts each time for the first few days of life.

Colostrum vs breastmilk The colostrum composition changes as your baby gets older, day one colostrum is not the same as day two or day three. Your colostrum and milk change weekly, daily and even hourly to perfectly provide your baby’s needs. The perfect unique nutritional needs of your baby will never go unmet when nursing. Some of these nutritional values include: allergy immunity components, laxative components, and long chain fatty acids. What are all of these things and why does your newborn need them?

The first one we will discuss are antibodies. Immunoglobulins are antibodies that focus on one pathogen and destroy one particular pathogen. Each antibody is made for its own assigned pathogen, to un-stabilize it and destroy it. The main immuniglobin is sIgA. It patrols various areas of the body. It is actually made and stored in the breast. It protects the digestive tract by latching on to the fat in the milk so it passes through the whole tract and is not absorbed into the intestines. Instead it can be used in the gut, as soldiers protecting the baby from disease.

Live blood cells are another huge component of breast milk. Every drop of colostrum is loaded with live white blood cells. There are up to five million white blood cells in each milliliter of colostrum. The average is about one million white blood cells per milliliter that is a hundred times more white blood cells than an adult has in their blood. Just to let you know how big a milliliter is - it is equal to one fifth of a teaspoon. That is a lot of white blood cells! Another type of live blood cells that are contained in colostrum are lymphocytes. They attack and kill germ cells, and they also break down proteins and fats so they can start their immunity functions.

Colostrum contains protein. Lactoferrin is the highest amount of protein that your baby will ever get from breast milk. Colostrum contains three times more protein than mature milk. It is chocked full of protein and lactoferrin that kills viruses, fungi, and many bad bacterial. It has an anti-inflammatory component and it also combats E Coli and yeast infections.

Oligosaccharides are simple sugars and carbohydrates in colostrum that keep and seal the digestive tract from harmful pathogens that cause diarrheal diseases, which are the most common threat to newborn health.

The laxative components of colostrum help prepare the baby’s intestines for food intake, which it has not used before its birth. This laxative helps get rid of meconium, which is the bowel substance (first poop) that accumulates in the baby during pregnancy. It is important to expel meconium as soon as possible, by doing so the baby is getting rid of unwanted bilirubin.

Jaundice is referred to as an excess of bilirubin. When baby is in the womb it has a need for many extra red blood cells to carry the oxygen through the baby. After birth, the baby obviously breathes from its lungs and has no need for the extra red blood cells. Once the baby is born, it needs to break down the extra red blood cells and dispose of them. The old, unneeded cells release iron and bilirubin during the break-down process. The iron is easily stored in the baby’s liver and other tissues to be used at a later date. However, the bilirubin must be eliminated from the liver. The baby’s small and immature liver cannot always render out the bilirubin as fast as it is made from the old cell breakdown. Physiologic Jaundice is normal and temporary and does not require treatment. The bilirubin is disposed of through the meconium. So the natural laxative and colostrum can highly benefit the baby by keeping the jaundice from turning into pathologic (abnormal) jaundice.

As you can see there are many benefits to colostrum, and these are just a few. Remember the key to an abundant milk supply is to feed the baby as soon as possible after birth and do not go longer than every two hours between feedings. Your ultimate goal should be to feed the baby ten to twelve feedings daily.

Do not be worried or discouraged if the baby just “plays at the breast”. This is common, normal and nature’s way of the baby getting to know you. Sometimes expressing a small amount of colostrum onto the baby’s lips will motivate more aggressive sucking.

Breastfeeding is one of nature’s most perfect gifts. I know this blog is a lot for YOU to digest, however, I just wanted you to know the importance of EVERY drop of colostrum. Enjoy your baby!

--------------- Disclaimer: Anticipation and Beyond uses all reasonable effort to provide accurate, up-to-date and evidence-based information for teaching and counseling purposes. All information that is written for blogs, social media posts, and websites is to be used for education and informational purposes only. All data and instruction from Anticipation and Beyond should not be intended to replace or substitute professional or medical advice from your health care provider. Direct all of your family’s concerns, questions, and health issues to your health care provider.   The information provided is not and may not be applicable to every situation. The purpose of Anticipation and Beyond providing guidance and education to new families is two-fold. The first purpose is for the intention of teaching parents about the many choices and alternatives that are available to them. The second motivation is to encourage families to dig down deep and research themselves from reliable resources that will help to enlighten their new journey.