recipe

Feeding New Parents

Our Hospitality team does a wonderful job of providing meals for new parents in our community. If you'd like to gift a new mom with food during the first few weeks, here are a few resources and ideas to get you started.index

Recipe Resources


Meal Ideas

  • Double Meals: Do half the work by doubling a recipe and making enough to feed your family and theirs
  • Snacks, Breakfast, etc.: Who says you have to send dinner?? Muffins, fresh fruit, oatmeal, granola bars...I know all of these healthy and easy-to-grab snacks would be appreciated by any new parent.
  • Favorite recipes: I find that the best type of dinners to take are soups, casseroles, or a meal kit (think: taco box, pasta box, etc.). Each of these comes together fairly easily, freezes well and transports smoothly.
  • Gift Cards: Grab a gift card from your favorite take-out or delivery spot. Or, send a grocery store gift card (Relay Foods and other delivery services are especially convenient). You could go in with a group of friends to with this idea, too.

If you would like the opportunity to prepare meals for new parents, join The Motherhood Collective meal team! Email our Hospitality Coordinator for more information and to sign up: hospitality@themotherhoodcollective.org.


*This post contains affiliate links. Thank you for supporting The Motherhood Collective!

 "Nod to Cincinnati Chili"

When I was growing up, one of my favorite dinners was "Three-Way Chili" otherwise known as "Cincinnati Chili."

Did you know that Cincinnati Ohio has their OWN chili? They even have restaurants dedicated to this chili, called "Skyline Chili." I wish I could recommend that you go eat at one of these little diners the next time you are in Ohio but...from my experience, nothing beats homemade "Three-Way/ Cincinnati/ Skyline" Chili.

The reason is is called "Three-Way" is that you eat this chili on top of spaghetti and topped with cheese (Three components). There is also Four-Way (add beans) and Five-Way (add raw, diced onions). But the Arpke family always loved "Three-Way" the best.

My dad makes the best Three-Way ever. In fact, I used to say that I wanted to eat this chili at my wedding. Considering my nick-name was "Slop-Slop" while growing up, it is a good thing that I chose NOT to eat this in my wedding dress when I got married.

The thing is, my current Meng family doesn't LIKE "Three-Way." It was too spicy for them and the spaghetti was just weird to my husband (Psh, husband!).

So this recipe is a "Nod"to Cincinnati Chili. There are a few secret spices that make me think of my dad's chili but otherwise, it is just an absolutely delicious (non-spicy!) meat, beans, and tomato chili.

Or, as I have been told at a potluck I took this chili to: "This is the best chili I have ever eaten!"

::blush::

So here it is: My "Nod to Cincinnati Chili"

Ingredients: 1 large or 2 medium onions, diced 1 lb ground beef 1 lb sausage (breakfast? Sage? spicy Italian? your choice!) 3-4 cloves of garlic (minced) (or a heaping tablespoon from a jar of minced garlic) 3 cans kidney beans, drained and rinsed 2 cans petite diced tomatoes, not drained 2 (8 oz) cans of tomato sauce 1 (6 oz) can tomato paste 5 cups water

Spices: (here's where it gets special)

Magic Spices (not pictured: Brown Sugar).

3 TB Chili powder 3 TB brown sugar 2 tsp unsweetened cocoa power* 1 tsp cinnamon* 1 tsp ground cumin 1 tsp dried oregano 1 tsp seasoning salt 1-2 bay leaves

See those stars above? It's the cinnamon and cocoa powder that give this chili the Cincinnati kick! If you want to make this chili with a packet of Chili seasoning from the store, go ahead! But don't forget the cinnamon and cocoa powder (and a bit of brown sugar!)

Make it! (start early in the afternoon so your chili can simmer away for a few hours)

Brown meat and onions in a large skillet over medium/high heat (or you can use your soup pot. I just find that it is easier to cook the meat in skillet). Drain fat and dump into a large soup pot. Key word: large.

Over medium heat, add the garlic and cook until fragrant. Add beans, tomato products, and water. Stir.

Add spices in a small bowl and mix until combined. Or just dump them in the pot. I just like the step of stirring all the spices together and then pouring such a delightful mixture into the pot.

This is where the magic happens. Your chili will turn from a tomato-red to a deep, dark, delicious, chili red. The cocoa powder is the key here to such a rich, dark color.

Bring your chili to a boil and then reduce to a simmer. Cock a lid over the chili, allowing a vent and simmer that baby for 2-4 hours, stirring occasionally. Your chili should get nice and thick. Before serving taste and adjust salt if needed.

My chili is simmering away on the stove. See that deep color? Mmm!

(I have made this in a crock pot too (cook meat and onions first, then dump everything in) but it doesn't get as thick as simmering it on the stove. Still yummy though!).

Enjoy the way your house smells all afternoon as you breathe in the heavenly scents.

Serve your chili plain or, the way I like it:  topped with sour cream, shredded cheddar-jack cheese, and a handful of fritos.

Enjoy!

Recipe of the Week - Kale with Garlicky-Lime Tahini Dressing

Kale with Garlicky-Lime Tahini Dressing Serves 1 (main course) Serves 2 (side dish)

Prep. time – 15 minutes

1/2 head of kale ¼ c. tahini ¼ c. EVOO Juice from 1 lime 3-4 large cloves garlic, minced/pressed ¼ t. coarse ground black pepper ½ t. anchovy paste

This recipe is to taste. Add more tahini, add less garlic, etc. to make it your own.

Rip kale leaves from stem, rinse and tear into bite size pieces. Place in serving bowl.

Place remaining ingredients in small mixing bowl and whisk for approximately one minute or until well blended and thick. Pour over kale.

Massage dressing WELL into kale with hands. Paying attention to the color and texture of the leaves. They should be bright green and soft.

Serve immediately as a side, or as a main with your choice of protein.

Refrigerate for up to a week.

Kanned Goods: DIY Natural Shampoo

Five months back, it finally happened.  I decided to go au natural  with my hair.  I had already reduced/cut chemicals, additives, and what-not in many areas of the home, but by golly I was holding on to my Garnier Fructis shampoo and mousse.  I still love the stuff, but have been more than pleased with the results of my homemade shampoo and yes…gel :). My first thought when people say they are going natural on their hair is the “No Poo” challenge, which basically means no shampoo, only baking soda and apple cider vinegar.  Well, there was some courage lacking in this department, so I thought I’d attempt an in-between.  I knew I didn’t want to pay for natural shampoos, so I decided to try a few recipes.

Easy, cheap, and effective shampoo

Of course, everybody’s hair is different, so the “no poo” might actually work for yours.  For some, my recipes might not work (although I think they’re pretty awesome).  Regardless of how healthy your hair is, there will be a transition period, especially if you use hair products regularly.  My transition period  took about a week.  Even if all you use on your hair is a store bought shampoo, you would be amazed at how much it still strips moisture from your hair (which is why so many people feel the need to then add a moisturizer).

I’m an all-or-nothing kind of gal, so I vowed not to put anything store bought in my hair for one month.  Yikes.  I was terrified.  I was expecting oily, flat, smelly hair that I would have to wrap in a bandana every day.  For the record, I’m not a bandana or hat person!

Nevertheless, I took the plunge.  I was honestly surprised at how painless it was.  And though I like it better now that my hair has fully adjusted, it really wasn’t so bad.  I used a blow dryer and brush and made it work.

Now, I spend hardly anything on my shampoo, and even less than that on my homemade gel (which I am LOVING! in this summer heat and humidity).

Shampoo Recipe 1:

If you feel your hair is damaged and could benefit from a gentle “stripping” shampoo, I would recommend this recipe for 1-4 weeks.  I used it for 3 weeks and it was very effective.  I personally wouldn’t recommend it for long term use due to how powerful castile soap can be when not diluted as much.  However, lots of people find it effective on their hair.

Mix:

¼ Cup Water

¼ Cup Liquid Castile soap (I use a scented Dr. Bronner’s)

½ Teaspoon Oil (like jojoba, olive, coconut, or grapeseed)

Shampoo Recipe 2:

This is my daily shampoo recipe that I use now.

Ingredients:

Note:  This is for a full recipe.  I usually halve it because I don’t want to store a gallon of shampoo

1 gallon of water

8 tea bags (I like a cheapo green tea best; you could just use water, as well)

1/2 cup baking soda

1/4 cup castile soap (I use a scented one-peppermint-so I don’t have to add essential oils)

3 tsp xanthan gum (for thickening; you could use cornstarch as well, but it tends to clump easier)

essential oils (about 30 drops-optional; I don’t use)

Instructions:

Place tea bags in large pot with water.  Bring just to boiling, then remove from heat, cover, and let steep for 10-15 minutes.

Remove tea bags and stir in baking soda.  It will fizz for a minute or so.

Mix in the xanthum gum, a little at a time, whisking vigorously.  Then add the castile soap.

After it cools completely you can stir in your essential oils (optional).

You can store the shampoo in an old washed out container. (I use a Homestead Creamery Jug.)  I put what I use daily in a spritz bottle.  This works really well for helping it foam, as homemade soaps don’t have all the foaming agents of store bought.

Gel recipe to come next month, and when my hair gets a little longer, I will begin experimenting with a detangling conditioner!

Recipe adapted from:  http://ashleyshomemadeadventures.wordpress.com/2012/01/24/homemade-shampoo/

Recipe of the Week - Pancakes

What could be better on a cold winter morning than pancakes? Chocolate chip pancakes! I No matter how you like your pancakes this basic recipe will help get your mornings off to a good start! I love it because I can substitute and add whatever I want without changing the texture too much. My husband prefers them plain, I sprinkle some chocolate chips into mine and my toddler is just happy we pretend to let him pour the syrup. Pancakes 1 cup of Milk (I substitute almond and/or coconut milk) 1 Egg (you could use ¼ cup of applesauce) 1 Tbsp. of Oil or Butter (I use coconut oil)

1 cup of Flour (I use whole wheat) 1 Tsp. of Baking Powder ½ Tsp. Baking Soda

Mix all the wet ingredients together and then add the dry ingredients. Fry them up on a buttered pan in whatever size or shape you choose!

Like I said above, I add dark chocolate chips to mine. I also sometimes add coconut or I mash a banana into the batter. You could add blueberries or nuts, whatever you want. The possibilities are endless.

To a Healthier Holiday

Last month our writers shared some of their holiday traditions and plans for the upcoming season. In November, we continue our conversation about holidays. How do we juggle visitors, travel with small children, eat well amidst all that delicious food and most importantly, take time to just BREATHE? This time of year can very quickly become stressful, so we hope our writers' words this month will give you a few moments to slow down, think about how you're spending your energy and encourage you during this busy, but wonderful time of year. ~TMC  Staying healthy over the holidays can be tricky...especially if you’re not the one doing the cooking! While I don’t want to be a party pooper, I have found that I have to be a little more hands-on when it comes to holiday meals. This has meant a lot of thinking ahead, preparing for possible awkward conversations, learning to "let go" and practicing graciousness.  While you may only have control over one or two dishes, there are a few things you can do to limit the chemicals and carbs in your holiday diet.

1) Limit the rolls or go whole wheat. I won’t hide it. I love bread! I would never be able to skip the rolls. I do limit myself to one roll but I also found this delicious whole-wheat roll recipe last year and I felt better about eating them throughout the weekend. http://realmomkitchen.com/1617/no-knead-whole-wheat-rolls/

Please keep in mind that most packaged yeast includes MSG. It is very easy to buy yeast, in bulk, from a health food store. For those of you who do not know how to recognize MSG, it’s listed, typically near the bottom of the list, as monosodium glutamate.

2) Make what you can from scratch. My father-in-law makes delicious pot pies with leftover turkey meat, but he uses canned soup. While I am thankful that he’s leaving me with 3 plus dinners in the freezer I'm not thrilled with the thought of all the MSG we, and especially my 1-year-old son, would be consuming.  I kindly asked if I could make the soup for him to use, and he didn’t mind. Here is the recipe I used. It was really simple to make, obviously, not as simple as popping the lid off the can but definitely worth the minimal extra effort. http://www.grouprecipes.com/70195/make-it-yourself--condensed-cream-of-soups.html

3) Halve the sugar! *According to the American Heart Association, the average American consumes 150 pounds of sugar a year! It sounds crazy, but start checking the ingredients list. Four grams of sugar equals one teaspoon. If you eat a bowl of cereal for breakfast, you’ve most likely already hit the recommended consumption of sugar for the day (six teaspoons) and it’s not even 9am. So, when it comes to baking that yummy pie, consider halving the sugar and even using a healthier substitute rather than white sugar. Honey, raw sugar, agave nectar, maple syrup or stevia are all great substitutes and there are many more.

4) Choose wisely and use common sense. If you’re given the option, a homemade dessert is going to be “healthier” for you than a store bought dessert. Also, remember you don’t have to eat everything. I am a people-pleaser so choosing one aunt’s dessert or dish over the other can be tough for me. I have to remind myself that others will eat it and no one will get their feelings hurt. You have the right to choose your calories. If you don’t care for mashed potatoes, don’t have any and eat more dessert!  I’m not a huge fan of pie so I double up on the sweet potato casserole. To each his own!

5) Pick your battles and practice flexibility. I mentioned the canned soup above. I know my father-in-law. That was a situation where I knew I wouldn’t be stepping on any toes. Now, if I had tried to suggest I make the piecrust, from scratch, for his famous Thanksgiving pies, my husband probably wouldn’t have spoken to me until January. Some things just are not worth it. Though the holidays seem to revolve around food, it’s really about being with your family and the people you love, among other things. If you can keep that as your focus and take a deep breath, those few extra chemicals, carbs or calories won’t seem to matter as much.

*http://www.doctoroz.com/blog/jodi-sawyer-rn/sugar-sour-side-effects

Recipe of the Week - Sweet Potato Casserole

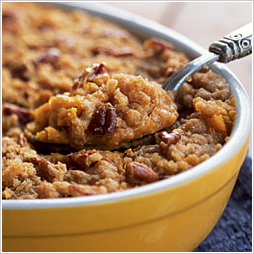
My favorite part of Thanksgiving is the Sweet Potato Casserole. Those of you who attended the Café a few weeks ago know why. It’s sweet yet salty, creamy yet crunchy. I eat the leftovers for breakfast, lunch and dinner all weekend long if I’m lucky enough to have any leftovers. This year I’ll probably get smart and do what I did for the Café – double the recipe and prepare my own little bowl just in case! Sweet Potato Casserole Sweet Potato Casserole 3 cups sweet potato, drained ½ cup sugar ½ tsp salt 2 eggs 1 stick of butter ½ cup milk 1 tsp vanilla ¼ tsp cinnamon

Topping ½ cup sugar 1/3 cup flour 1 stick butter Optional – pecans and/or walnuts

Mix all together. Put in casserole dish. Cover with topping. Bake at 350 for 35-45 minutes uncovered.

**The most important thing to remember about this recipe is that you can (and should) cut the butter and sugar in half and you will not taste a difference.  I’ve also used raw sugar instead of cane and I always use whole wheat (white) flour. Enjoy!

  If you have a favorite recipe you'd like to share with our readers, please submit it here or email us at submissions@themotherhoodcollective.org

Recipe of the Week - Pumpkin Cookies

spoon_edited-1.jpg


These are a fall family favorite in the Earl household. We typically only last a few days without before making a new batch. The best thing about them, besides the taste, is they can be relatively healthy if you follow my directions in bold and avoid the frosting. They are delicious both ways; I prefer them without the frosting but they make a festive addition to any party if you frost and top with a piece of candy corn.

Pumpkin Cookies 2 cups flour – I use whole wheat flour. 1 cup quick oats 1 teaspoon baking soda 1 teaspoon ground cinnamon 1/2 teaspoon salt 1 cup butter softened – I substitute at least ½ cup coconut oil. 1 cup firmly packed brown sugar – I only use ½ cup and sometimes replace with honey. 1 cup of sugar -  I only use ½ cup of raw cane sugar. 1 egg 1 teaspoon vanilla 1 cup Libby’s Solid Pack Pumpkin 1 cup semi sweet chocolate chips or M&M’s (optional) I skip this. 1 cup raisins (optional) – I skip this. 1 cup nuts (optional) – I skip this.

Preheat oven to 350 degrees. Combine flour, oats, baking soda, cinnamon and salt. Cream butter, gradually add sugars, beating until light and fluffy. Add egg and vanilla; mix well. Alternate additions of dry ingredients and pumpkin,  mixing well after each addition. Stir in morsels. Drop dough, using cookie scoop or teaspoon, onto lightly greased cookie sheet. Bake 10-11 minutes until cookies are firm and lightly browned.  This recipe will make close to 60 cookies.


Cream Cheese Frosting 1, 3-ounce package cream cheese 1/4 cup butter 1 teaspoon vanilla 2 cups powdered sugar

In a mixer bowl beat together cream cheese, butter and vanilla till light and fluffy. Gradually add powdered sugar, beating until smooth.