vegan recipes

Recipe of the Week: Butternut Squash Mac ‘n Cheeze

Husband approved. Cook approved. Vegan approved. Omnivore approved. ‘Nough said. Butternut Squash Mac n Cheese


This recipe is Vegan with Gluten-free & Nut-Free options

Yield: 4 servings or 1.5 cups of cheeze sauce

Ingredients:

1 fresh butternut squash* (peeled and chopped) OR 1 cup canned butternut squash OR canned pumpkin Extra virgin olive oil, S & P 1 tbsp Earth Balance (or other non-dairy butter replacer) 3/4 cup unsweetened & unflavoured almond milk (revised from 1 cup) 1 tbsp arrowroot powder (or cornstarch) 6 tbsp nutritional yeast, or more to taste 2 tsp Dijon mustard 1/4-3/4 tsp garlic powder 1/2 tsp onion powder 1/2-1 tbsp fresh lemon juice 1/2-1 tsp kosher salt (to taste) & ground black pepper, to taste 4 servings brown rice macaroni (8oz or half a 16oz package) makes 3 1/4 cup cooked Mix-ins of choice (e.g., kale, spinach, broccoli, peas, pumpkin seeds, etc)

1. Preheat oven to 425F. Line a casserole dish with tin foil. Mix chopped squash with EVOO, S & P. Roast for about 40 minutes, uncovered, or until tender.

2. Meanwhile, prepare the cheeze sauce in a pot on the stove top. Add Earth balance over low-medium heat. In a bowl, whisk together milk and arrowroot powder (or cornstarch or flour) until clumps are gone. Add into pot and whisk. Stir in remaining ingredients (nutritional yeast, Dijon, garlic, lemon, S & P) and whisk over low heat until thickened (about 5-7 minutes or so).

3. Cook your pasta according to package directions. The sauce makes enough to cover 4 servings of pasta.

4. In a blender, blend the sauce with 1 cup of roasted squash (or if using canned, simply stir 1 cup into the pot).

5. Add cooked, drained, and rinsed macaroni into pot, along with cheeze sauce & mix-ins. Heat and serve.

Lauren's Notes: 1) My 3.5 pound squash made 5 cups cooked squash, so I had about 4 cups leftover. 2) The sauce does not cut in half well (the blender has a hard time blending it up) 3) I tried this recipe with canned pumpkin and it was awesome!

Read more: http://ohsheglows.com/2011/10/03/butternut-squash-mac-n-cheeze/#ixzz2gUMpfiPb

Recipe of the Week - Kale with Garlicky-Lime Tahini Dressing

Kale with Garlicky-Lime Tahini Dressing Serves 1 (main course) Serves 2 (side dish)

Prep. time – 15 minutes

1/2 head of kale ¼ c. tahini ¼ c. EVOO Juice from 1 lime 3-4 large cloves garlic, minced/pressed ¼ t. coarse ground black pepper ½ t. anchovy paste

This recipe is to taste. Add more tahini, add less garlic, etc. to make it your own.

Rip kale leaves from stem, rinse and tear into bite size pieces. Place in serving bowl.

Place remaining ingredients in small mixing bowl and whisk for approximately one minute or until well blended and thick. Pour over kale.

Massage dressing WELL into kale with hands. Paying attention to the color and texture of the leaves. They should be bright green and soft.

Serve immediately as a side, or as a main with your choice of protein.

Refrigerate for up to a week.

Recipe of the Week - Yet Another Green Smoothie Recipe

Green SmoothieI feel like I have tried every green smoothie recipe known to man.  I love them all.  My toddler, not so much.  He’ll drink it, but only ever half, and sometimes with bribing.  I know, I know.  Many of you are aware that I’m a big fan of Baby-Led Weaning.  And bribing isn’t a word in their vocabulary.  But I just get so excited about the rawness and goodness of these drinks!  And in my opinion, what’s not to like, right? I finally thought that maybe I was adding too much.  Maybe the flavor palette was overwhelming him.  So I simplified, but still left the greens :).  He downs it now, and also has no idea that I put his probiotic in there ;).  It is now tasty, cheap, and easy.

I had the brilliant idea of adding a little frozen juice concentrate (we use this for vitamin C sometimes).  It adds great flavor, and though we’re not juice fans at our house, I felt this was such a small amount.

This recipe makes enough for all 3 of us.

Ingredients:

2 cups unsweetened coconut milk (more or less depending on how thick you like it)

2-3 bananas

1 + cup spinach leaves

2 + Tbsp. orange juice concentrate (the kind you find in the freezer section)

Blend all ingredients in a blender/food processor.  Adjust to taste.

If you want something more filling for breakfast, add ¼- ½ cup of oatmeal.  It thickens it nicely and is a wonderful grain for mamas and babies!

Recipe of the Week - Asian Style Fried Rice and Beans

Image Courtesy of:  http://www.bhg.com/recipe/asian-style-fried-rice-and-beans-1/  

We love fried rice, but it is hard to find a recipe that tastes as yummy with healthy ingredients and brown rice.  I came across this one in the Better Homes and Gardens magazine, and love it!  I never would have thought to add beans to fried rice.  It is super simple as well, and we always have leftovers.

Ingredients:

½ pineapple, peeled, cored, and sliced, or 8 oz. canned pineapple slices (I use canned)

1 Tbsp. oil (I use coconut oil.)

2 medium carrots, sliced

4 cloves garlic, minced

2 tsp. grated fresh ginger

2 cups cooked brown rice (Leftover works even better.)

1 15 oz. can garbanzo beans, rinsed and drained

1 cup frozen peas, thawed

3 Tbsp. reduced –sodium soy sauce

1/3 cup fresh cilantro

1 lime, halved (optional)

(You could also add scrambled eggs, for added protein.)

Directions:

In a 12-inch nonstick skillet, heat 2 tsp. of the oil over medium heat.  Add pineapple; cook about 2 minutes per side until golden brown.  Remove from skillet and set aside.  (Note:  Canned pineapple won’t get the same caramelized look, but it will still taste delicious).

Pour the remaining 1 tsp. oil into the hot skillet.  Add carrots; cook, stirring frequently, for 5 minutes or until just tender.  Add garlic and ginger; cook 30 seconds.

Stir in brown rice, garbanzo beans, and peas.  Add soy sauce.  Cook and stir about 4 minutes or until heated through.  Stir in cilantro.  Return pineapple to pan.

To serve, squeeze lime over all.  Top with additional fresh cilantro leaves, if desired.  Makes 4 servings.

Recipe of the Week - Energy Fudgies

One year ago, I went off all dairy, cold turkey, in hopes of solving my health issues.  It was hard, and I was desperate.  I always wanted something sweet, but I wasn’t yet adept at substitutions.  My “Go Dairy Free” book arrived in the mail, and this was the first thing I made out of it.  It was delicious, healthy, simple, and I always have the ingredients on hand.  This is a great energy boost for the afternoon, filled with protein, healthy fat, and a small dose of calcium.  It is also great when you’re entertaining others with allergies, as it is grain, egg, and milk free! Carob Fudgies:  yields 20 bite-sized snacks

½ cup creamy almond, peanut, or sunflower butter (I love the almond the best) ½ cup agave nectar, honey, or light corn syrup (I do ¼ each of honey and agave) ½ cup sifted carob or cocoa powder (sift then measure) ½ cup sesame seeds ¼ cup unsweetened shredded coconut

In a small saucepan, combine the nut butter and the sweetener.  Stir over medium-low heat until the two are melted together, about 2-3 minutes.  Remove from the heat and gradually stir in the carob/cocoa powder, followed by the sesame seeds, until everything is well combined.  Place the mixture in the refrigerator for 10 to 15 minutes to set up.  Place the coconut in a small dish.  Remove mixture from the fridge, and using a small spoon, scoop up some fudge.  Roll it into a 1 inch ball, and roll it in the coconut.  Repeat with remaining fudge.  Store them in the refrigerator. Energy Fudgies

If you want them to set up more, place them in the freezer.

Recipe of the Week - Weekly Granola

I have been a cereal addict for most of my life.  There have been many lunches and dinners where I was too lazy to put something together and just enjoyed a bowl of milky, crunchy goodness.  My husband and I wanted to get away from all the high-fructose corn syrup cereals, so we switched to more “natural” ones.  When Gabriel started wondering why he had to eat sugarless oatmeal while we pulled out the boxed breakfast, I realized I should evaluate our breakfasts a little more.  Even though all these cereals had no HFCS, they were still full of sugar, refined grains (aka, more sugar), and pretty pennies.  We did a couple weeks without cereal, but got tired of oatmeal and eggs. I had made granola before, for special treats, but they were always either full of sugar, tasteless, or pricey (because of all the delicious nuts and dried fruit).

I finally came across this recipe from “Pure Goodness,” and modified it to fit our needs.  We love it!  And I feel totally fine with giving this to Gabriel for breakfast, soaked in coconut milk happiness, or, when I get around to it, delicious homemade coconut milk yogurt (and before you think that sounds like way too much, I’ll confess that I have a yogurt maker appliance that literally just plugs into the wall.  It’s easy, and it works!).

I usually double this recipe, and make it every 10 days to 2 weeks.  This is the only cereal we have on hand anymore, and we can now have a variety of granola, eggs, and hot oatmeal.  It’s very flexible, so play around with it until you like it too!

If you want a “special treat” granola that tastes better than ANY store bought cereal I’ve ever had, check out this one:  http://ohsheglows.com/2012/10/12/cinnamon-bun-granola-recipe-halloween-treat-a-thon/.  While you’re at it, gorge yourself on the entire blog.

There are a couple tricks I use for every granola recipe now:  heat the liquids and salt together before combining with the dry oatmeal, bake on parchment paper, and let the granola sit for a while on the hot pan after removing from the oven (this is how you get the glorious clusters!). Coconut Granola Tropical Coconut Granola (Single Recipe)

3 cups rolled oats

1 cup unsweetened shredded coconut

¼ cup honey

1/6 cup coconut oil

1 Tbsp. vanilla extract

½ tsp. salt

Dash of cinnamon (optional)

1-3 Tbsp. ground flax seed (optional)

Raisins, dried fruits, nuts (optional)

  1. Heat oven to 300 F
  2. In a large bowl, combine oats, shredded coconut, and optional nuts
  3. In a small saucepan cook honey, oil, vanilla and salt over medium heat until the mixture just begins to simmer.
  4. Pour honey/oil mixture over oats and coconut flakes, optional cinnamon and flax seed, and stir with a wooden spoon until the well combined.
  5. Spread out granola on a parchment paper lined baking sheet.  Place in oven, bake for 10-15 minute increments, then stir granola.  Repeat until well-toasted, normally 30-40 minutes.
  6. Cool on baking sheet.  Add dried fruits when cooled.  Stir in airtight containers for up to two weeks.  Can also refrigerate or freeze for longer shelf life.

Recipe adapted from:  http://www.puregoodness.net/recipe-nutrition/tropical-coconut-granola/

Recipe of the Week - Bananas Soft Serve with Chocolate Sauce

My new absolute favorite “I can’t believe this is healthy” treat to make is Bananas Soft Serve with Agave Chocolate Sauce.  Seriously.  You will not be disappointed!  The best thing about these recipes is they’re very allergen conscious.Banana Soft Serve Bananas Soft Serve:  this has the consistency of ice cream which pretty much makes it amazing!  I love it by itself and a la mode style.
Ingredients: Bananas

Directions: Peel and break bananas into thirds.  Place in Ziploc bag and freeze.  Blend in your food processor for about 5 minutes.  It takes a while but after a few minutes they will turn into ooey-gooey consistency.

Agave Chocolate Sauce:  tastes amazing and is so healthy!  Again, allergen conscious.

Ingredients: 1 Tbsp. unsweetened cocoa powder 2 Tbsp. agave nectar

Mix the two together and pour over Bananas Soft Serve!

Recipes taken from:  http://www.choosingraw.com/banana-soft-serve/

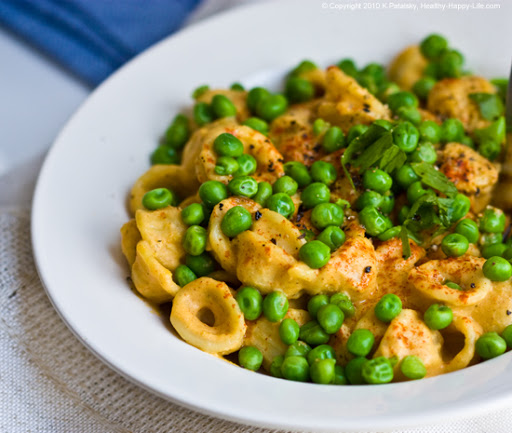
Recipe of the Week - Vegan Mac and 'Cheese'

Not long after our son was born, we discovered he had GERD (severe acid reflux), which was aggravated by a protein intolerance. This has made for some incredibly hard times over the past year, but also a lot of growth. One of the ways we grew, (by force) was in our eating adventures! I breastfed for the first 4 1/2 months, and any proteins I ate that our son couldn't digest made for an unpleasant few days (to put it mildly). This caused us to search out foods that wouldn't bother his digestive system, but also didn't taste like cardboard. This was one of our favorites; even a year later, my meat-loving husband asks for this frequently - it's that good!

Recipe adapted from http://kblog.lunchboxbunch.com.

1 bag orecchiette pasta, 16 ounces 3/4 cup nutritional yeast flakes (or to taste - we usually use a bit more) *start small and add more nutritional yeast as needed 3 Tbsp Dijon mustard 2 tsp garlic powder 1 medium or 2 small sweet potatoes, peeled/baked 1 1/4 cups plain non-dairy milk (we have used rice and coconut - both work well!) 1/2 tsp black pepper 3 Tbsp EVOO

1/2 tsp sea salt (to taste) 1 Tbsp maple or agave syrup 2 Tbsp paprika a few dashes cayenne powder (opt'l-a little goes a long way) 1 Tbsp apple cider vinegar

Instructions:

1. Cook your sweet potato until soft (in microwave or oven).

2. Start a pot of salted water to boil on the stove. Add your pasta when boiling. Cook pasta for about 8-10 minutes, or until tender.

3. In a bowl combine: milk, mustard, spices, nutritional yeast, agave, salt, vinegar and oil. Stir well until all ingredients are blended.

4. Drain pasta and pour into another large bowl; toss with additional nutritional yeast flakes if desired.

5. Remove skin from your sweet potato. Add it to the sauce. You can mash by hand, or if you own a handy-dandy immersion blender, use that to incorporate into the sauce until smooth.

6. Add sauce to the pasta and coat well.

7. Steam peas (or other veggies) and mix in.

8. Add salt and pepper to taste!

This is wonderful re-heated as well, and I promise, you won't even miss the cheese!

Recipe of the Week - Homemade Cream of Mushroom Soup

I was determined to have my traditional Green Bean Casserole this holiday season, even with my milk allergy.  I was very excited when I came across this Homemade Cream of Mushroom Soup recipe to make it possible!  I’m still not one of those people who wants to pour it over everything, but I do like the occasional creamy vegetable bake.  Even if you’re not sensitive to milk, this recipe will help cut back on the fat and salt content.  Hmmm…now I need to pull all those old family recipes back out that I had given up.  The wow factor: it’s very simple to make! Homemade Cream of Mushroom Soup Ingredients:

1 ¼ cups cold unsweetened alternative milk (cashew, rice, soy, almond, coconut—I’ve made the twice and I recommend the coconut milk way over the almond milk)

2 Tbsp. flour (can use rice flour for gluten free option)

1 Tbsp. cornstarch

1 Tbsp. oil

¾-1 tsp. salt

1/8 tsp. onion powder

Generous pinch of garlic powder

½ cup canned mushrooms (pieces and stems), drained

Directions:

In a small saucepan, whisk together all but the mushrooms until smooth.  Stir in the mushrooms.  Place the soup over medium-low heat and whisk continuously until the mixture thickens significantly, about 10 minutes.  Remember, you are looking for a very thick, condensed cream of mushroom soup consistency.  Once complete, it will weigh out to roughly 10 ¾ ounces or 1 ¼ cups.

Use in recipes as you would the original.

Condensed Cream of Celery option: Briefly sauté 1 cup of diced celery in 1 tsp. of oil over medium low heat, just 2-3 minutes.  Add the celery to the original recipe in place of the mushrooms.

Recipe taken from the book “Go Dairy Free.”

Recipe of the Week - Carrot or Zucchini Pineapple Bread

spoon_edited-1.jpg

The last six months have been quite a journey for me and my kitchen. I discovered that I am allergic to dairy, and that even the smallest hint of casein, lactose, and whey will give me side effects. I did not realize quite how big the mountain before me was. But scale it I did! I could not have done this without Alisa Marie Fleming’s “Go Dairy Free: The Guide and Cookbook for Milk Allergies, Lactose Intolerance, and Casein-Free Living.” You can also visit her website: http://www.godairyfree.org/Go-Dairy-Free-Guidebook.html. The great thing about her recipes is that so many of them come with alterations that can take other allergies into account. For instance, I always make this bread with the banana instead of the eggs or yogurt. One, it’s cheaper. Two, it makes this bread vegan (which just impresses people when they bite into it).

This bread recipe has been one of my favorites. If I invite you to my house, you will probably eat it. I’ve made this with both the Carrot and Zucchini, and love both in their own ways. I included the recipe for the glaze, but I’ve personally always found it so moist that I never felt it needed it. There is also a pretty small amount of sugar for the type of bread it is, and the fruit adds such good sweetness that I’m going to start experimenting without the sugar. I’ll let you know the end result. Enjoy!

Carrot or Zucchini-Pineapple Bread

Bread: 2 cups all-purpose flour, or whole wheat pastry flour 1 tsp. cinnamon ¼ tsp. allspice 1 tsp. baking powder 1 tsp. baking soda ½ tsp. salt ¾ light brown sugar, firmly packed ½ cup grapeseed, canola or vegetable oil or dairy-free margarine, softened (or regular butter) 1 cup grated zucchini or carrot 1 8 oz. can crushed pineapple with juice (do not drain!) 2 eggs, ½ cup unsweetened applesauce, or mashed ripe banana (about 1 medium), or 1/3 cup plain diary-free yogurt (or regular yogurt) ½ cup chopped raisins (omit if using zucchini) ½ cup chopped pecans or walnuts (optional)

Optional Glaze:

1 Tablespoon pineapple juice (reserved from crushed pineapple) ½ cup powdered sugar 1 tsp. agave nectar or corn syrup (I would probably use honey) ¼ tsp. cinnamon

Preheat over to 350 and grease the bottom of a 9x5 loaf pan. In a medium-sized bowl, sift together the flour, cinnamon, allspice, baking powder, baking soda, and salt and set aside. In a large bowl, blend the brown sugar, oil, eggs (or yogurt, applesauce, or banana) until smooth and creamy. Stir in the rest of the pineapple (reserve 1 tbsp if making glaze) and carrot or zucchini. Add flour mixture to your mixing bowl and stir just to combine. Be careful not to over-mix, a few lumps are okay. Gently fold in the raisins and nuts, if using. Pour batter into loaf pan. Bake for 45-55 min. or until a toothpick inserted into the center comes out clean. Allow bread to cool for 10 min. before removing it from the pan.

To make the glaze, combine pineapple juice with powdered sugar, syrup, and ¼ tsp. cinnamon. Mix until smooth, and spoon over the warm loaf. For an extra-moist loaf, poke holes in the top of the loaf before pouring on the glaze. Allow the bread to cool completely, wrap, and store in refrigerator.


If you have a favorite recipe you'd like to share with our readers, please submit it here or email us at submissions@themotherhoodcollective.org.


The Motherhood Collective is on Facebook. Like us, then comment on our giveaway post for a chance to win a family photo shoot from Adam Barnes Photography. Our contest ends when we hit 500 Likes!

Recipe of the Week - Chocolate Zucchini Muffins

banana_chocolate_muffin_1.jpeg

Motherhood Cafe Mama, Allison Earl, says, "My entire family loves these. Plus, they're vegan so you don't feel guilty!" Moist and chocolatey, you won't believe that these muffins are healthy, almost completely fat-free and have a veggie slipped in! This is also a great way to use up all that leftover summer harvest zucchini!

Ingredients: 1¼ cups whole wheat pastry flour ¼ cup unsweetened cocoa 1¼ tsp baking powder ¾ tsp baking soda ½ tsp salt 1 tsp cinnamon 1 whole banana, mashed ½ cup raw sugar ½ cup unsweetened applesauce ¼ cup non-dairy milk 1 tsp vanilla extract 1 cup shredded zucchini ½ cup raw sugar (optional)

Instructions: Preheat oven to 350F. Grease muffin pan and set aside. If using paper liners, lightly spray inside of liners with cooking spray to prevent sticking. Whisk flour, cocoa, baking powder, baking soda, salt and cinnamon together. In another bowl, cream mashed banana with applesauce and sugar (use extra 1/2 cup for a very sweet, dessert-like muffin). Add in soymilk, vanilla, zucchini and any other optional add-ins you might like such as vegan chocolate chips or chopped raw walnuts. Stir until evenly combined. Add flour mix to wet mix in 3-4 batches and stir until just combined. Spoon batter into greased muffin pan and bake 18-25 minutes, or until a toothpick inserted into the center comes out clean.

Note: These muffins store well both in the fridge and freezer & the raw sugar in this recipe may be reduced to 1/4 cup.

This recipe was originally posted on the blog, The Happy Herbivore. Image by Staci Perry.


The Motherhood Collective is on Facebook. Like us, then comment on our giveaway post for a chance to win a family photo shoot from Adam Barnes Fine Art Photography. Our contest ends when we hit 500 Likes!