saving money

Budgeting Hacks from a Freelancer Mom

So you’ve made a decision to be a stay-at-home mom. Despite all efforts to balance work-life, 24 hours just doesn’t seem enough for both family and career. You know that there are many other jobseekers waiting to take your job, but there is only one person who can best take care of your kids – and that’s you.


The whole idea just sounds liberating, but there are worries that go with the life ahead. You know that giving up your income means cutting down your savings too. Well there are always ways to balance income and spending. Here are 10 budgeting hacks for stay-home moms.


1. Income vs. Spending

Logically, the income you gave up from your career must equal your cuts in spending. Fortunately, not having to go to office has already saved you some money effortlessly – from transportation to designer clothing and commercial food. Now all you need is to find a few more sources of potential savings. Try searching in your credit card bill. You might find some habitual purchases that aren’t necessary after all.


2. Be creative

When cutting down on unnecessary purchases isn’t enough, it’s time to cut down on the basics. This doesn’t mean a complete turnaround in your lifestyle. It may only entail a little creativity, like redesigning your home to conserve energy and water. Consider these simple ways of achieving sustainable home designs:


·         Insulate your home. Insulating acts as a barrier to prevent heat from passing in during summer, and passing out during winter.


·         Use energy-efficient lighting, like LED and CFL bulbs.


·         Choose efficient appliances with positive product reviews.


·         Turning electrical appliances off, instead of leaving them in standby mode also saves on energy.


·         Collect rainwater for your plants.


3. Downsize a bit

You may also consider downsizing your house to a townhouse or condo. Find one that provides the right living space for your family. It can provide you the same comfort while saving on mortgage/rent and maintenance costs.


4. Do it yourself

As you spend more time at home, you may discover that there are services you formerly paid for that you can now do yourself like housekeeping and babysitting. Aside from saving money, you’ll see that sometimes, nobody can do the job better than the big boss.


5. Home cooking

Even a budget meal in a restaurant could not compare with the taste (and cost) of mama’s home cooking. This also allows you to choose the right food that satisfies your family’s nutritional needs.


6. Plan ahead

Of course, you don’t want to miss on birthday celebrations and family vacations. When big expenditures like these come along, it’s best to plan ahead. This keeps you from splurging, while keeping the occasion as special and memorable as you intend it to be.


7. Garage sale

Budgeting is not all about cutting on costs, but finding additional sources of income too. Why not try having a garage sale. As your kids grow, you’ll find lots of stuff that they’ve outgrown that are still worth selling.


8. Create and sell

Your old stuff may not be only thing worth selling. It’s time to look into things you can create that others cannot, or simply don’t have time to do. Beaded jewelry, arts and crafts, cakes and cookies – these may just be some things you can make and sell for extra income.


9. Online selling

Well it doesn’t have to be your own creation. You can source products worth selling to your neighbors and friends. Selling online further expands your market without requiring you to leave your home.


10. Establish a career at home

Being a stay-home mom does not necessarily mean the end of your career. As your kids grow, you’ll also find the need to grow and expand your horizon and establish a career at home. Good thing, there are home-based jobs, such as online careers that allow you to keep your talents useful.


As moms, we are always willing to make the necessary sacrifices for our kids’ physical and emotional wellbeing. But this doesn’t mean we need to sacrifice on our budget items and personal growth. It only takes a few adjustments to shift from career woman to stay-home mom. Once you’ve overcome the adjustments, you’ll be amazed to see that with the same 24 hours a day, attending to your kids, balancing you finances and using to your talents to earn extra income are all possible.


by Jona Jone

Jona Jone is a Washington Times Communities writer and a mother of 2 (going 3) kids.


How to Shop at a Thrift Store

Kids are expensive, so is their stuff. While kids grow like weeds; their clothes and toys do not. So how can you provide material things for your child without going into bankruptcy? Buy used! I've been thrifting for about 15 years and I still can't get enough. Now that I have children, it's even more of a thrill because I'm thrifting with a purpose rather than just as a hobby. We've saved thousands of dollars through buying items used or trading with other parents. If you're eager to save money but intimidated by the huge stores with racks of weird looking clothes, I've broken down the essential tips for successful money saving experiences:

Tips for Thrifting
  • Know your child. If you're child(ren) already hate shopping, DON'T TAKE THEM WITH YOU. A thrift store is not like Target. It is a time commitment and can be full of temptations for short-legged, sticky-fingered creatures like children. Personally, I think it's absolutely worth paying a babysitter so you can have the time to really evaluate what you're looking for.
  • Pace Yourself. Thrifting can be like a road trip - keep a full stomach and empty bladder! If you go into the store hungry and irritable, you've already lost. You should plan to spend at least 1 hour in the store so you can really dig and find great bargains.
  • Location Counts. If you're searching for something in particular, location will determine what you will find. Affluent neighborhoods yield higher quality and more current items. Older neighborhoods have fantastic vintage items. Southerners love Vera Bradley. Yankees love leather. Young neighborhoods have children's items, etc.
  • Dress appropriately. Not all thrift stores have a dressing room, and the thrift stores that do have dressing rooms are usually packed with other people. With that in mind, it's easiest for the person trying on clothing to wear slim fitting pants, a slim fitting top, and slip-on shoes so one can try things on over existing clothing.
  • Know your brands. You may be surprised how many high-quality brands end up on the racks of a thrift store. If you have an entrepreneurial spirit like me, there's also a better chance of re-selling the item later if it's a recognizable brand.  I bought an Oilily dress for Joanna for $.75 at Goodwill. She wore it about about 6 times before outgrowing it. Because of the brand, I was able to sell the dress on eBay for $12!  But be careful - selling on eBay can be very hit and miss. Major brands and professional sports team apparel are more likely to sell, but there are no guarantees.
  • Discount Days. Some locations offer discount days. Our local Salvation Army takes 25% off every Wednesday. The DAV has $5 bag days where you pay only $5 for whatever you can shove into a bag. Call ahead to see what kind of discount your local thrift store offers.
  • Go with your gut. If something catches your attention, check it out! If it's fabulous but too big, it can be altered. If it's adorable and too small, you could use it as something else. A skirt, little apron, scarf, etc. Check out New Dress A Day for some incredible before and after photos. The things she comes up with range from simple to genius.
  • Most things can be fixed with some TLC.  Plastic toys are easy to clean. I tend to stay away from battery operated toys because the battery can be corroded by the time it ends up in the thrift store. In terms of clothing, if you can patch a hole or create a hem, you can turn many things into a functional piece of clothing. If something has a stain that doesn't come out, you can dye it to a new color.
  • Smart Phones are your friend. If I'm looking to make an investment or check to see if something has all of its parts, I always use my smart phone to do some research. Below, you'll see a photo of an espresso machine below that I bought for $12. It's an older model from the late 1990s, but it was unused. The gamble paid off because it makes wonderful coffee and lattes.
  • Have fun! Thrifting is best enjoyed as an adventure with others. If you can, try to go with others that aren't your size otherwise you may find yourself fighting over bargains. Especially shoes.
  • Espresso
    My $12 Krups Espresso Machine is my favorite thrift find to date.
    SAMSUNG
    Gap Maternity Dress for $4.50 / sold later for $64.00 on eBay
    But what about Yard Sales?
    I have two different strategies for yard sales. Either start early or start late. If you start early, you'll get first dibs on the good stuff. If you start late, you'll get the best prices but it will be picked over. Your strategy will depend on whether you are looking for something in particular or if you're going for fun.
    • Start Early. Early can mean 6 a.m. or 7 a.m., depending on your local yard sale culture. Some yard sale listings will have a time and some may even say "No Early Birds.".
    • Start Late. Late can mean 11 a.m. to 1 p.m. I usually prefer to go later so I can snag better deals. More often than not, people are so tired of staring at their possessions that they'll give you many items for free! I can't count how many children's clothing and toys I've received for free when all I really wanted was a lamp. Did I take the free stuff? Of course I did! If its free, its for me.
    • Bring more cash than you think you'll need. If you think you only want to spend $40, bring $100. If you only want to spend $100, bring $200. You may find a great piece of furniture that you didn't expect to find. You don't want to ask them to hold it while you run to the ATM - chances are that if they have another buyer, they won't hold it for you. (Nor should they!) If you end up with extra cash at the end of the morning, hide it in your freezer for a rainy day.
    • Location Counts. Just like with thrift stores, the neighborhoods determine what you will find. Kids items, vintage, high end goods, etc.
    • Check Craigslist. Nowadays, most families no longer list their yard sales in the newspaper - they use the internet. Craigslist is my go-to for yard sale announcements. Some even include photos of the items.
    • Always ask for a deal. If the sticker says $5, ask if they'll take $3. The worst thing they'll say is no.
    • Bundle Bundle Bundle. If you're getting more than one thing, ask for a lower combined price. Like I said before, the previous owners want to get rid of their stuff as quickly and as economically as possible. They will usually take the lower price just to see it go.
    • Just like thrifting, keep a full belly and an empty bladder. If you're hungry, you're already off of your game.
    • If the kids are selling lemonade and cookies, buy them. This isn't really a saving money rule, but its just a good thing to do. Those kids worked hard. They deserve the $.50 and a $4.50 tip.
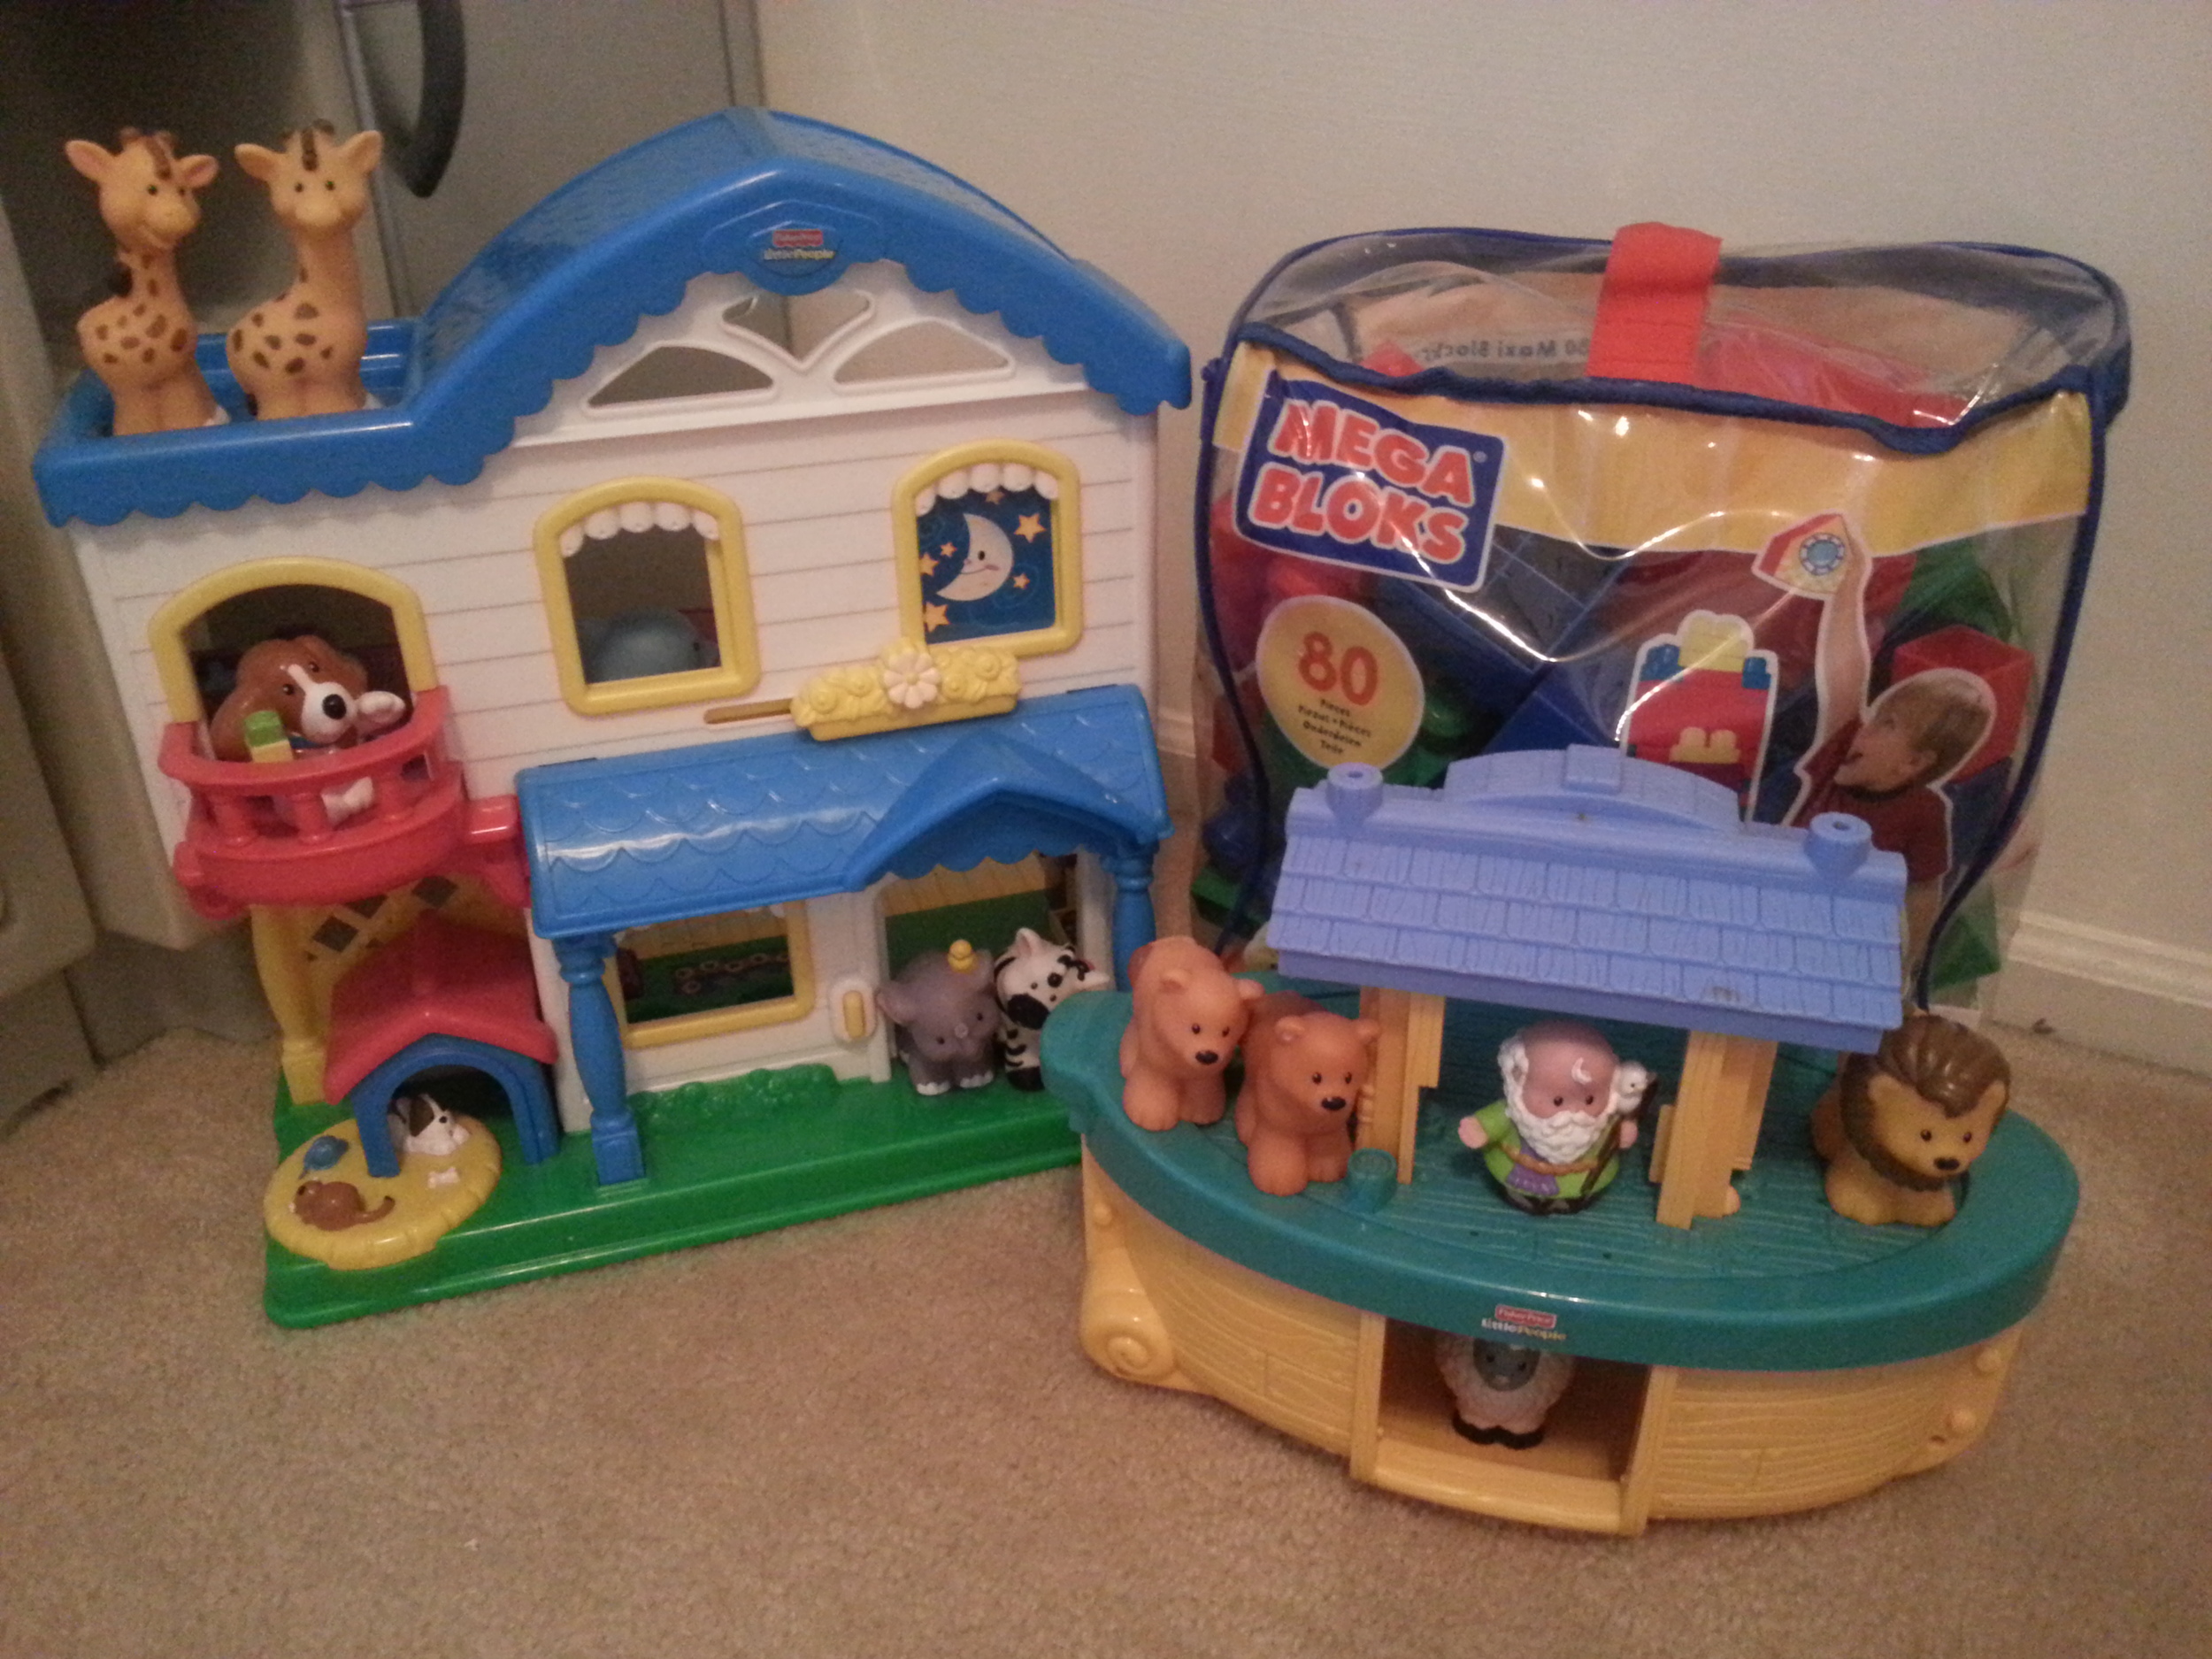
    • Plastic can be washed. Below are photos of my most recent yard sale finds. Little People brand toys can go for $20 to $50, depending on the models. I snagged the doll house for $2 and Noah's Ark with the animals for $.50. The Mega Blocks in the back can retail for $35 and I paid $7. All of them were very easy to clean and my little girl LOVES them! The other photo is her 2-sided play kitchen that we bought for $40. The former owner even gave us all of the food and kitchen accessories for free because we were helping her clean out her house.


    20130808_124815 PhotoGrid_1375980729198

    So what are your favorite finds? Did you get them at a yard sale? Thrift store? Retail store? Be sure to share about it in the comment section!

    Kanned Goods: DIY Natural Shampoo

    Five months back, it finally happened.  I decided to go au natural  with my hair.  I had already reduced/cut chemicals, additives, and what-not in many areas of the home, but by golly I was holding on to my Garnier Fructis shampoo and mousse.  I still love the stuff, but have been more than pleased with the results of my homemade shampoo and yes…gel :). My first thought when people say they are going natural on their hair is the “No Poo” challenge, which basically means no shampoo, only baking soda and apple cider vinegar.  Well, there was some courage lacking in this department, so I thought I’d attempt an in-between.  I knew I didn’t want to pay for natural shampoos, so I decided to try a few recipes.

    Easy, cheap, and effective shampoo

    Of course, everybody’s hair is different, so the “no poo” might actually work for yours.  For some, my recipes might not work (although I think they’re pretty awesome).  Regardless of how healthy your hair is, there will be a transition period, especially if you use hair products regularly.  My transition period  took about a week.  Even if all you use on your hair is a store bought shampoo, you would be amazed at how much it still strips moisture from your hair (which is why so many people feel the need to then add a moisturizer).

    I’m an all-or-nothing kind of gal, so I vowed not to put anything store bought in my hair for one month.  Yikes.  I was terrified.  I was expecting oily, flat, smelly hair that I would have to wrap in a bandana every day.  For the record, I’m not a bandana or hat person!

    Nevertheless, I took the plunge.  I was honestly surprised at how painless it was.  And though I like it better now that my hair has fully adjusted, it really wasn’t so bad.  I used a blow dryer and brush and made it work.

    Now, I spend hardly anything on my shampoo, and even less than that on my homemade gel (which I am LOVING! in this summer heat and humidity).

    Shampoo Recipe 1:

    If you feel your hair is damaged and could benefit from a gentle “stripping” shampoo, I would recommend this recipe for 1-4 weeks.  I used it for 3 weeks and it was very effective.  I personally wouldn’t recommend it for long term use due to how powerful castile soap can be when not diluted as much.  However, lots of people find it effective on their hair.

    Mix:

    ¼ Cup Water

    ¼ Cup Liquid Castile soap (I use a scented Dr. Bronner’s)

    ½ Teaspoon Oil (like jojoba, olive, coconut, or grapeseed)

    Shampoo Recipe 2:

    This is my daily shampoo recipe that I use now.

    Ingredients:

    Note:  This is for a full recipe.  I usually halve it because I don’t want to store a gallon of shampoo

    1 gallon of water

    8 tea bags (I like a cheapo green tea best; you could just use water, as well)

    1/2 cup baking soda

    1/4 cup castile soap (I use a scented one-peppermint-so I don’t have to add essential oils)

    3 tsp xanthan gum (for thickening; you could use cornstarch as well, but it tends to clump easier)

    essential oils (about 30 drops-optional; I don’t use)

    Instructions:

    Place tea bags in large pot with water.  Bring just to boiling, then remove from heat, cover, and let steep for 10-15 minutes.

    Remove tea bags and stir in baking soda.  It will fizz for a minute or so.

    Mix in the xanthum gum, a little at a time, whisking vigorously.  Then add the castile soap.

    After it cools completely you can stir in your essential oils (optional).

    You can store the shampoo in an old washed out container. (I use a Homestead Creamery Jug.)  I put what I use daily in a spritz bottle.  This works really well for helping it foam, as homemade soaps don’t have all the foaming agents of store bought.

    Gel recipe to come next month, and when my hair gets a little longer, I will begin experimenting with a detangling conditioner!

    Recipe adapted from:  http://ashleyshomemadeadventures.wordpress.com/2012/01/24/homemade-shampoo/